

(wink not included in tutorial)
I wrote this tutorial using PSPX2 and Animation Shop 3
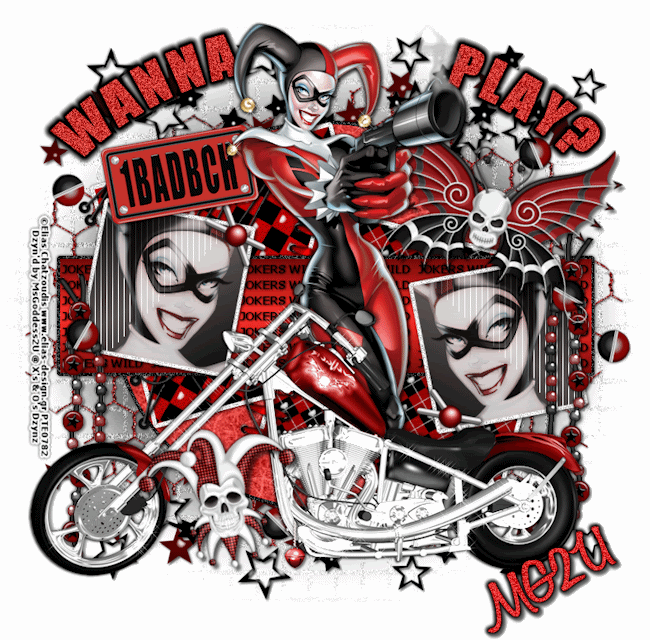
I am using another awesome tube by Elias Chatzoudis, you must have a license to use his work, which comes with the purchase of the tube, and you can get it at PTE
I am actually using 2 kick ass kits by Tamie, Harley Queen and Biker Babe (we need Biker Babe for the motorcycle) and you can purchase these kits at Dreams-N-Digital
(If you act quickly, Biker Babe is on sale right now for only 75 cents;)
I am using a template that I made for this tag and you can get it here
My supplies (1BADBCH License plate and chain) here
Plug-ins Used:
Eye Candy 5: Nature/Smoke
Eye Candy 4000/Gradient Glow
Xenofex2/Constellation
dsb flux/Bright Noise
Font used:
Honey Script
Remember to save often!!
**c&p=Copy and Paste As New Layer
**When working with duplicate layers, I always refer to them as 1st, 2nd, 3rd…and so on, working from the bottom up.
I usually keep my Drop Shadows on separate layers until I am done (or close to it anyways) just in case I want to switch something up
Open template, Duplicate (Shift+D), close original, delete credits
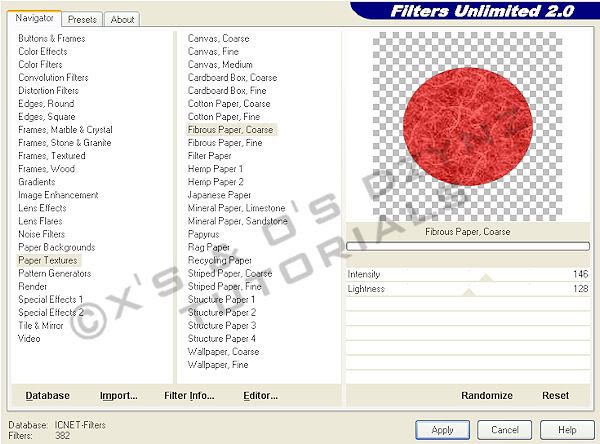
Activate the oval and apply Filters Unlimited 2.0 with these settings

You can go ahead and Merge Down the Oval Frame and add Drop shadows to the Oval, if you wish
Tubes: c&p, both the main tube and the CU, Duplicate the CU and mirror. Position and arrange the layers of both CU’s, to your liking, within the frames of sm squares1 & 2
CU: Activate sm square1 and, with your Magic Wand, set to these settings


click on the transparent area of the layer (selecting all the area around your sm square)
Activate the CU that is right above it and hit delete on your keyboard. Select>None. Repeat steps for sm square 2 and CU.
Both CU’s: Apply Radiance at default settings, set layer properties at Blend Mode: Luminance (L) and Opacity: 70%. Duplicate both CU’s and change the layer properties to Blend Mode: Normal, Opacity: 50 and apply Porcelain with these settings.

Merge Down the 1st CU onto sm square1 and then the Merge Down the 2nd CU. DO NOT MERGE YOUR CU’s TOGETHER FIRST! It is very important that you do this in the order that I have. It is much less work than making just those layers visible and then Merge>Visible; however, you can do it that way too. Repeat these same steps for sm square2 and CU’s
Papers:
Activate lg square1, c&p a paper of your choice and Rotate it 15o Left.
Activate lg square1 again and, with your Magic Wand, click on the transparent area, Activate your paper layer and hit Delete on your keyboard.
Repeat these steps on lg square2 changing only the Rotation of your paper to the Right
Activate the white background and Select>All, Image>Crop to Selection (Shift+R)
Elements:
String: c&p, resize 80%, Rotate15o Left, position to liking and arrange layer above lg square1 frame (if you add a drop shadow, make sure you add it on a new layer)

Eyeletribbon2: c&p, Resize 60%, Rotate 15o Right, adjust the Brightness and Contrast with these settings

Arrange layer just above lg square2 frame and position the ribbon so that it is centered over the frame
Wire: c&p, resize 110%, arrange layer to just above the mask layer
Screw: c&p, resize 25%, duplicate multiple times and position to liking
Screws on the ends of the rectangle: grab your Pick Tool, position one at Position X: 85 & Position Y: 403; the other screw, Position X: 674 & Position Y: 356. Arrange these 2 layers just above the sm square frame 2 layer rotate each one with a random degree. If you are happy with their positions, merge the 2 layers together.
Rotate the remaining screws at Random degrees and arrange the layers just above the wire layer. Once you have arranged one layer down, you just have to activate the next one and hit (Ctrl+Y) on your keyboard to repeat the last action…do this until all of your other screw layers are arranged above your wire.
You can merge all of your screws together now, if you would like, but I would wait til I was completely done, just in case you want to move some or arrange them above other layers.
Stars: c&p, Mirror, Flip and position to your liking, arrange layer just above your screws; Duplicate and Flip again and position to your liking. Again, you CAN merge these 2 layers together or leave them separate so that you can adjust them later, more easily, if you would like.
Beads: c&p, Resize 60%, apply Brightness and Contrast with these settings

Position to liking and arrange layer below the screw over sm square frame1, Duplicate, Mirror and position below the screw over sm square frame2
Staple: Open, Duplicate (Shift+D) and close the original. (we are changing the color and it will be easier to see what you are doing without any background)
Grab your Lasso at these settings

Select this portion of your staple, being careful not to select any of the metal (I zoomed in at about 800%)

Using your Manual Color Correction Tool, set at Source: #2c2c2c, Target: #590000, click on “OK”
Select>None, c&p onto image
Resize 50%, Duplicate, position each staple at the corners of the frames (refer to my image) and arrange each one above its corresponding sm square frame. Duplicate both staples.
Activate the 1st staple over sm frame1 and Rotate 25o Right, activate the 2nd staple and rotate 70o Right.
Activate the 1st staple over sm frame2 and Rotate 10o Right, activate the 2nd staple and Rotate 55o Right
you can merge the 2 sets of staples or all 4 staple layer, if you are happy with the position.
Skullfly: c&p, Resize 50%, Rotate 15o Right, position to you liking and arrange layer below tube
Skull: c&p, Mirror, Resize 50%, Rotate 11o Left, keep this layer at the top for now and position the skull near the bottom of the image
Motorcycle (from the Biker Babe Kit):
Open, Duplicate (Shift+D) and close your original
Grab your Lasso Selection tool with these settings


And select these parts of the bike

Open New Raster layer and Flood fill selection with this color #c4332c
Select>None
Your image should now look like this

Change the Blend Mode to Soft Light and Adjust>Brightness and Contrast with these settings

Duplicate and lower Opacity to 30%, Merge Visible, c&p into your tag image, below your skull layer, mirror, resize and position to liking
You can now position the skull to your liking as well
Close the motorcycle that you just re-colored. Saving it is up to you, as long as you save it as an option to the kit or to a folder of Tamie’s kits, since it is still her image and part of her PTU kit. FYI: Re-coloring it does not make it yours or free to share.
Bell (from Harley Queen Kit)
(a bell at the bottom of a motorcycle, is to ward off the evil spirits on the road, you may want to skip this part since it is so small, it’s up to you but I just could not make this graphic, with that bell element available and not put it to use…lol)
Open bell, Duplicate (Shift+D), close the original, resize canvas to these settings

Chain (from my supplies): c&p onto the bell image and position like this

Merge visible, c&p onto tag, resize 20% and position at the bottom of the bike like this…

Open my license plate: c&p, Resize 25%, Rotate 10o Left, position to liking and arrange below tube layer
This next step is optional (as is anything in any tut really…LOL)
Activate your string layer; Grab your Magic Wand with these settings

Select the inside of the eyelets that are visible over the large oval, making sure that you extend out a little...you may want to expand your selection by a couple pixels but I didn't need to
(The number of eyelets will depend on where your tube is positioned
I started out with more but moved my tube, leaving only one eyelet showing…lol)

Activate the large oval and hit delete on the keyboard. Repeat on all/any layers between the selected eyelets and the mask (excluding the string Drop Shadow, if you have one)
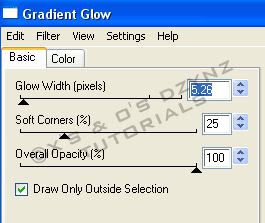
Word Art: Activate the Wanna Play? word art background and apply Gradient Glow with these settings


Name: Set your Foreground and Background to the same color and make both visible (I used #e52325)
Grab your text tool and select Bold, Stroke Width: 1, Kerning: 0, type out your name and click Apply. Rotate 30o Left, position to your liking, name the layer Name Vector, Duplicate, hide the original, Convert the Duplicate to Raster, name the layer “name” LOL…Duplicate 1X
Activate your 1st name layer and apply Gradient Glow with these settings, leaving the color the same

I also applied drop shadows, both directions, on the same layer
(V: -1, H: -1 O: 45, B: 3 & V: 3, H: 3, O: 60, B: 3)

to make it “pop out” more
Now that we have the basics of our design all put together, find a good place to add the copyright and your license number.
I suggest that you position it in a manner that it cannot be removed or tampered with, without being obvious.
If you are animating this tag and you want to add drop shadows to the squares with frames, Duplicate each frame 1X and merge it down onto the square first, then you can add your drop shadows to the merged layer. You may want to change the name of the duplicate frame layer, deleting “Copy of”, just to keep better track of your layers, when we duplicate for animation.
We are animating the white frames, the gun and the little gold balls on the Jester hat on the tube, the motorcycle, the bell, word art and name. If you wish to add drop shadows to any of these elements, make sure you do it/them, BEFORE adding the animation effects and check the box that says “Shadow on new layer”
DO NOT add any Drop Shadows to the bell yet
Drop shadows on the word art background and name background (the one with the Gradient Glow) can be added to the same layer
To make things a little easier, you can arrange your sm square layers, frames, and staples, and merge each group together, like this…

Merge together all the layers between the layers that we are animating, including any Drop Shadows that you have. The Merged Layer will have the name of the last layer you Merged Down onto.
For example

(Excuse my funky layer names but that is how I keep track of what I have done)
There are other times that we don’t get so lucky and cannot consolidate any layers and we end up with these “stand alone” non-animated layersL like this

Such is the life of designing…lol
Now, lets start adding the animation J
Activate the Wanna Play? word art layer, Select>All, Select>Float, Select>Defloat, Merge Down onto the word art background.
Duplicate 7X, activate the 1st layer and apply Bright Noise with these settings

Repeat (Ctrl+Y) on the 2nd thru the 8th layers, clicking on Mix 2X for each new layer
Activate your tube and grab your Magic Wand with these settings


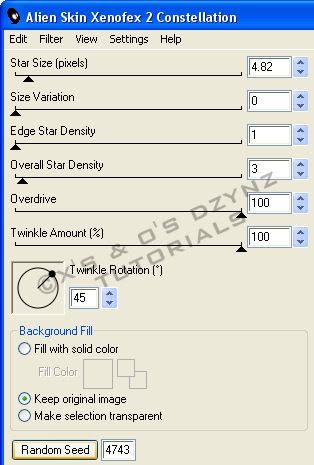
Select the areas of the gold balls on the hat that you want to sparkle, Duplicate the tube 7X, activate the 1st layer and apply Constellation with these settings.
(you don’t need to change the random seed value)

Repeat (Ctrl+Y) on the 2nd thru the 8th layers, clicking on Random seed for each new layer
Now grab your Selection tool with these settings

and select the inside of the gun barrel like this

(it may take a few times to get it right)
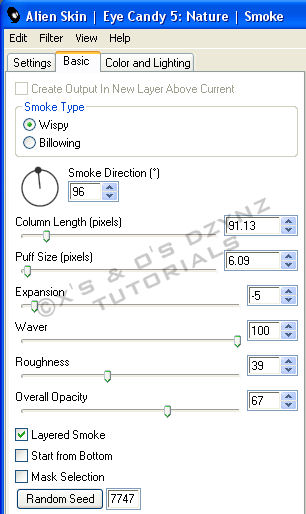
Activate your 1st tube layer and apply Smoke with these settings

Repeat (Ctrl+Y) on the 2nd thru the 8th layers, clicking on Random seed for each new layer
Activate the lg square1 frame layer, Select>All, Select>Float, Select>Defloat, Merge Down onto lg square1 and Duplicate 7X, activate the 1st layer and apply Bright Noise with these settings

Repeat (Ctrl+Y) on the 2nd thru the 8th layers, clicking on Mix 2X for each new layer
Repeat the above steps for lg square2 frame and lg square2
Select>None
Duplicate the merged sm square frames layer 7X, activate the 1st layer and Apply Bright Noise with the same settings, clicking on Mix 2X for each layer
Activate your motorcycle layer and, with your Magic Wand set to these settings

select the parts of the motorcycle that you want to sparkle
Apply Constellation with the same settings as you used on the gold balls
(I forgot to make a screenshot of the settings but I have gone back and tried the last settings used and I think that I must have used the same settings as I used on the gold balls)

Repeat (Ctrl+Y) on the 2nd thru the 8th layers, clicking on Random seed for each new layer
Bell:
This one sounds intimidating but it's really not, once you do it…
Name the layer bell1, Duplicate and Rotate 15o Right, line up the end of the chain with the first layer and name it bell2.
Duplicate bell1 again and arrange the layer above bell2, Rotate 30o Right, line up the end of the chain and name it bell3.
Duplicate bell2 and arrange it above bell3, name it bell4, Duplicate bell1, arrange it above bell4 and name it bell5.
Duplicate bell5, Rotate15o Left, line up the end of the chain and name it bell6.
Duplicate bell5, arrange above bell6, Rotate 30o Left, line up the end of the chain and name it bell7.
Duplicate bell6, arrange it above bell 7 and name it bell8.
If you lined up the ends of the chains correctly, your bell with swing smoothly
Here is a screen shot that is zoomed in at 800%...hopefully it will help

Quick Tip: Checking your animations...Duplicate the image (Shift+D), right click in the layers palette and select View>All, then make all the layers of your animation (the bell, in this case) invisible, right click on a visible layer and select Merge>Merge Visible, right click on the merged layer and Delete.
Right click on one of the remaining layers and select View>All, save as a .psd and then open in AS3, set the Frame Properties (Alt+Enter) to what you intend to use for the finished image and select View>Animation. It sounds like a lot of work but, once you do it, you'll see that it is pretty simple and quick and saves a lot of frustration. Plus, if one IS out of place, you can slow the animation down really slow and figure out which one it is:)
Now you can add Drop Shadows, if you wish, to each bell, on the same layer
Activate the 2nd name layer, Select>All, Select>Float, Select>Defloat
Merge Down onto 1st name layer (the one with the Gradient Glow) and Duplicate 7X.
Activate the 1st layer and apply Bright Noise with these settings

Repeat (Ctrl+Y) on the 2nd thru the 8th layers, clicking on Mix 2X for each new layer
OK…now we get to merge all of these together
Duplicate all of your non-animated, merged and stand alone elements and layers 7X (just to be clear, you want 8 layers of everything)
Activate your 1st background layer (the very bottom layer in your layers palette), right click, View>Current Only
Now, make ONLY the 1st layer of each group visible, right click on your visible background layer, Merge>Merge Visible.
Make this layer invisible and make the next layer in each group visible, right click on your visible background layer, Merge>Merge Visible make this layer invisible and continue to repeat these steps until you have all of your layers merged. View>All, Crop and either resize in PSP or you can resize it in AS3; save as a .psd or .psp (animation shop)…I always save as a .psd
If you are saving as a WWO, you know what to do…if you don’t, refer back to one of my earlier tuts
Animation Shop 3
Open your image in AS3, Select>All (Ctrl+A), Frame Properties (Alt+Enter) and change the value to 13, hit Enter on the keyboard.
Resize (Shift+S), if you need to, and Optimize (Shift+Z)
Whew!! We are finally done!!!
I really did not intend for this tut to be so long but I just couldn’t help but keep adding more to it…lol
I would love to see your version or results of my tut and would like to add them to my blog. Feel free to email them to me; just make sure that you put “tut results” or something to that effect, in the subject or I will delete it without opening it
©X's & O's Dzynz and Tutorials
This Tutorial was written in July, 2011 by me, MsGoddess2U, and the concept of the tutorial is copyrighted.
See my TOU for further details
See my TOU for further details
No comments:
Post a Comment