I wrote this tutorial using PSPX2 and Animation Shop 3
I am using a beautiful tube by Jose Cano. You must have a license to use his art and you can purchase his art at PTE
I am using a gorgeous kit called Dreaming from Designs by Sarah and you can purchase it at Pimp My Tags W/Scraps
Mask used is MC_Mask3 by Melissaz Creationz
My supplies can be snagged here
Plug-ins Used:
Xenofex2 / Constellation
dsb flux / Bright Noise
Font Used:
Marela
Remember to save often!!
**c&p=Copy and Paste As New Layer
**When working with duplicate layers, I always refer to them as 1st, 2nd, 3rd…and so on, working from the bottom up.
Let’s Get To it
Open my word art and Resize Canvas (Image>Canvas Size) to 850 X 850
And choose the top middle for placement, like this
Set 2 guides, 1 vertical guide at 206 and 1 horizontal guide at 158 and move your word art down to that position, like this
Open New Raster Layer, arrange it at the bottom and Flood Fill with white
CU: c&p
sb_pmt_frame1: c&p, resize 90%, Duplicate your frame and immediately lock these 2 layers to together. Arrange one of the frames below the CU layer and position the CU to your liking, lock the CU to your frames.
Activate the CU layer. Grab you Lasso tool with these settings
and select this part of your CU
Hit Delete on your keyboard. Select>None
Activate the CU, Select>All, Select>Float, Select>Defloat
Activate the 2nd frame and erase only the parts of the frame that cover her head and hair
Activate your 2nd frame layer, reduce the Opacity enough that you can see the CU and eraser the rest of the frame that is NOT covering your cut off on your CU, return the Opacity to 100%
Activate the 1st frame layer and, with your Magic Wand at these settings
Click inside your frame, Expand your selection by 2 (Selections>Modify>Expand), Select>Invert
Activate the white background, c&p a paper of your choice (I used sb_pmt_dreaming_pp12), Duplicate, activate your 2nd paper layer, position to liking, hit Delete on the keyboard, Select>None
Activate the 2nd paper layer, resize 115%, name it Mask; open your mask, Minimize, right click on the Mask layer, in the layers palette and scroll up to New Mask Layer>From Image, choose your mask from the drop down menu
Your mask is automatically the active layer in the group, grab your pick tool, set to Scale, and use it to bring your mask in to your liking. Right click on a layer in the Mask Group and select Merge>Merge Group. I moved my mask down a little, after I merged it.
Duplicate, merge the 2 layers together, duplicate again. Activate the 2nd mask layer and apply Gaussian blur (Adjust>Blur>Gaussian Blur) set at 3. Reduce opacity of 1st mask layer to 70%, merge these 2 layers together and name the layer Mask.
sb_pmt_flower 4: c&p, resize 70%, mirror arrange layer below CU and position to liking.
Activate the layer below the flower and open New Raster Layer and flood fill with black (this is so we can see all the white sparkles)
Activate the flower layer and grab your Lasso, using the same settings,
select the white sparkles coming out of the flower, like this
right click on the layer in the Layers Palette and select Promote Selection To Layer, name this layer Flower Sparkles (we are going to animate this one) and lock it to the flower layer. I added Drop Shadows to the flower but NOT the sparkles
sb_pmt_dreaming-flower 11: c&p, resize 80%, arrange below CU/Shadow
sb_pmt_flower 7: c&p, Resize 60%, position to liking and arrange above flower 11
sb_pmt_dreaming-bow 1: c&p, resize 75%, position to the right, arrange above flower 7
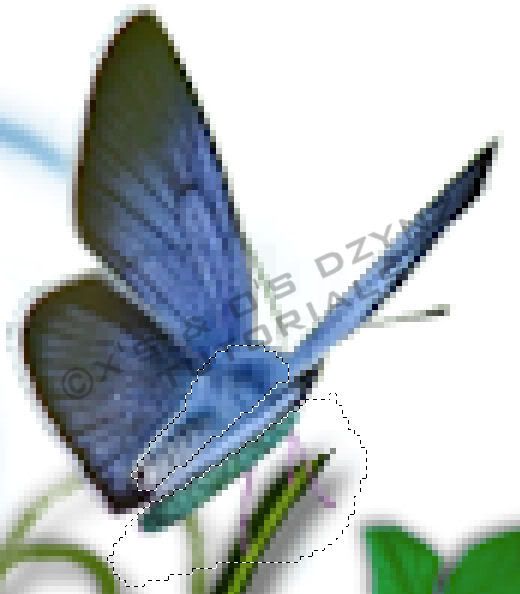
sb_pmt_butterfly 2; c&p, position at bottom left, grab your Lasso tool, same settings
and select these 2 butterflies
Edit>Cut, DO NOT SELECT NONE, open New Raster Layer, Edit>Paste Into Selection, Select>None, Rotate 45o Right.
Activate the original layer of butterflies and Rotate 15o Right. Keep these layers at the top; you may want to lock them together to ensure that they don’t accidentally get moved
I also copied and pasted each of the top 2 butterflies on separate layers, mirrored the larger one and positioned both on the right.
I added a Drop Shadow of Vertical and Horizontal both set on 6, Opacity at 40%, Blur at 8; again with the Vertical and Horizontal both set to -1, Opacity to 50 , Blur 3
sb_pmt_dreaming-butterfly 6: c&p, mirror, resize 60%, position near top of flower 11 arrange the layer to just above the flower sparkles layer (I erased some of the vine at the top of flower 11)
name this layer butterfly1, select area the around body and legs with you’re your Magic Wand, same settings,
So you have something that looks like this
Select>Invert, Duplicate, name this layer butterfly2
Grab the Warp Brush Tool, found here
And change to these settings
Manipulate the wings in on both sides. Tick the check mark, if you are happy with your positioning and the red “X” to undo it all and start over.
Duplicate this layer, name it butterfly3, repeat the same steps as above, trying to get the same amount of space between the wings. You will need to reduce your brush size (I reduced to 46), so that you are not pushing the wings on the other side at the same time; you just have to work your way down the wing that you are working on.
Duplicate butterfly2, arrange layer above butterfly3 and name it butterfly4, lock these 4 layers together.
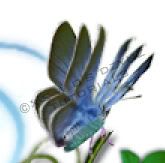
This is how my first 2 layers look
This is how my 3 layers look
And, of course, your 4th layer is just a duplicate of the 2nd
***You can check your butterfly animation, before moving on, by duplicating your image (Shift+D), right click in the Layers Palette and select View>All, make your butterfly layers invisible. Right click on a visible layer in your Layers Palette and select Merge>All, right click on the merged layer and select Delete; right click on a butterfly layer and select View>All, Crop and save a .psd draft. Open in AS3 and Select>All (Ctrl+A), change frame timing to 13 (Alt+Enter), View>Animation
Sb_pmt_dreaming-light 2: c&p, resize 75%, position to your liking to the right, arrange just above the mask layer, Duplicate, Mirror, Flip, position to liking, at the top left…I duplicated each layer again and flipped and mirrored, and positioned at the bottom of my image, erasing a few that I didn’t want. Merge these layers together and name the layer dreaming lights
Tag: Open my tag, c&p, Resize to your liking (I went with 73%), position to liking arrange below the butterflies
Name: Set your Foreground to #062e72, Background to #81dede, Type name click on apply, Rotate 90o Left, position over tag, you can now adjust the font size to fit the tag (just position your text tool over the text til you see this symbol [A] and click on it. Your text box will open up with the name already highlighted) once you have the size you want and positioned where you want it, name it name vector, Duplicate, hide the vector, Convert the Duplicate to a Raster
Select>All, Select>Float, Select>Defloat, apply Xero / Soft Vignette with these settings
DO NOT SELECT NONE
Apply Brightness and Contrast with these settings
Now, go to Selection Borders (Selections>Modify>Select Selection Borders)
Use these settings
Open New Raster Layer and Flood Fill the selection with your Foreground color from above, Select>None, apply a Drop Shadow with these settings
Name this layer Name Outline
Apply Drop Shadows to your liking
Now that we have our design together, find a good place to add the copyright info. I suggest that you position it in a place that it cannot be removed or tampered with, without being obvious.
Animation
We already have the butterfly animated; we are going to animate the name, dreaming light, word art and flower sparkles.
Merge together all layers in between these layers, including the backgrounds and any Drop Shadows, there are some layers that can be arranged to merge with other layers to give you less layers to have to work with; I arranged flower_4 just above flower_7, leaving the sparkles where they are
Let’s start with the flower sparkles and dreaming lights
Activate your flower sparkles layer and Duplicate 3X
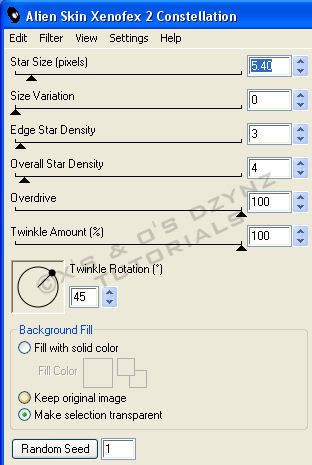
Activate the 1st layer and apply Constellation with these settings
Clicking on Random seed for layers 2-4
Activate the dreaming lights layer and Duplicate 3X
Activate the 1st layer and apply Constellation with these settings
Clicking on Random seed for layers 2-4
Activate the “In Your Dreams” layer, Select>All, Select>Float, Select>Defloat, Merge Down on to the merged layer below it and Duplicate3X
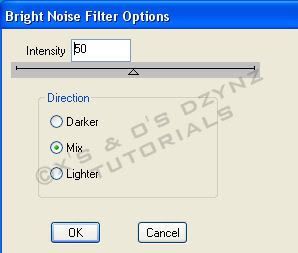
Activate the 1st layer and apply Bright Noise with these settings
Clicking on Mix 2X for layers 2-4
Select>None
Arrange the name layer just above the merged layer with the tag, Select>All, Select>Float, Select>Defloat, Merge Down, Duplicate 3X, activate the 1st layer apply Bright Noise using the same settings and following the same steps as with the word art.
Duplicate the name outline 3X
Duplicate the white background 3X, right click on the 1st background layer and select View>Current Only,
Now, make ONLY the 1st layer of each group visible, right click on your visible background layer, Merge>Merge Visible.
Make this layer invisible and make the next layer in each group visible, right click on your visible background layer, Merge>Merge Visible make this layer invisible and continue to repeat these steps until you have all of your layers merged. Right click in your Layers Palette and select View>All, Crop, resize to your liking and save as a .psd or .psp (animation shop)…I always save as a .psd to open in AS3 and I also save a .psp (pspimage) so that I have my settings for the name.
Animation Shop 3
Open your image in AS3, Select>All (Ctrl+A), Frame Properties (Alt+Enter)=13, Optimize (Shift+Z)
And there you have it…we are done
I would love to see your version or results of my tut and would like to add them to my blog. Feel free to email them to me; just make sure that you put “tut results” or something to that effect, in the subject or I will delete it without opening it
©X's & O's Dzynz and Tutorials
This Tutorial was written in July, 2011 by me, MsGoddess2U, and the concept of the tutorial is copyrighted.
See my TOU for further details
See my TOU for further details


No comments:
Post a Comment