Background

Navigation Bar

TWI Member

Monday, March 12, 2012

My Apologies

I want to apologize to everyone for not having anything new for so long.  I have been raising a litter of puppies for the last 8 weeks here is my little photo album of them.  One has had some serious medical issues.  I've had sleepless nights and crazy days.  With 5 puppies pooping and peeing and trying to train them to the pee pads and all that.  I just don't have the time for tuts.  

I'm taking my baby girls dad to court and requesting a safety plan for visitation in a supervised facility. 

I have an online store that I was just trying to get going, when all of a sudden my life got so crazy.  If anyone is interested in feather jewelry, medicine bags, dream catchers, ear cuffs, clip in feather hair extensions...come see me at Sparrow Hawk Dzynz.  I don't have much up there right now but more is coming soon.  You can also see sold items in the Showcase in the Photo Gallery.  I take requests for custom made items, as well.  I'm only allowed to post 10 items for sale with the package I bought but I don't even have 10 yet...LOL

So...anywhoooo....that is what has kept me away.  I actually have one that is almost done.  I was finishing up on it when I got the puppies.  I'll see if I can get that done and up...if I still like the way it looks...

Sunday, November 27, 2011

Enchantress (PTU)


I wrote this tutorial using PSPX2 and Animations Shop 3

You will need your MCC (Manual Color Correction Tool) for this tut.  This tool is my best friend!  It is not in the default tools in PSPX2.  If you do not have it and do not know where to find it, I wrote a quick tut on retrieving it and adding it to your tools here.

I am using a gorgeous tube by Michael Calandra.  You must have a license to use his art.  You can purchase his art at PTE

I am using an awesome kit by Tamie, “Forgotten Places”, and you can purchase it at Dreams-N-Digital

Mask is WSL_Mask4 by weescotslass creations

I am supplying you with a Gradient (hope it works) here

Plug-ins Used:
Xenofex2/Constellation
dsb flux/Bright Noise
Eye Candy 4000/Gradient Glow

Font used:
Saginaw

Remember to save often!!

**MCC=Manual Color Correction Tool 
**c&p=Copy and Paste As New Layer

**When working with duplicate layers, I always refer to them as 1st, 2nd, 3rd…and so on, working from the bottom up.
I usually keep my Drop Shadows on separate layers until I am done (or close to it anyways) just in case I want to switch something up

Let’s Begin 
Open your tube, Duplicate and close the original.
Resize the canvas to 750X750 pixels, Centered

Décor7: c&p; MCC Source: #727586, Target: #9e8486, repeat; Mirror, Flip, arrange to liking.

Flowers3: c&p, Resize 75%; MCC Source: #a9a9aa, Target: #f0e2cb, Brightness/Contrast: Brightness: 28, Contrast: 0, Duplicate, Rotate 90o Left, position to liking

Flowers2: c&p, position to liking; MCC Source: #ffffff, Target: #eee2ca, Duplicate, Mirror, Rotate 90o Left, position to liking, erase overlap

Mask: c&p, Resize 60%, Rotate 30o Left

CU: Duplicate, Mirror, Resize 185%, Rotate 17.65o Left, Sharpen, arrange layer just below the mask and position eyes in mask.

Activate mask layer: with your Magic Wand (Mode: Add), click inside each eye, Expand your selection by a value of your choice (I used 10), Invert Selection, hit Delete on keyboard, Select None.
(this looked to big to me so I merged all the layers and Resized it again 80%)

Dragonfly: c&p, Resize 50%, Mirror; MCC Source:  #4d535c, Target: #7e5745; Brightness/Contrast: Brightness: 13, Contrast: 4

Vines: c&p, arrange just above white background, position to liking; MCC Source: #202429, Target: #897246

Ribbons: c&p, Mirror, Rotate 15o Left, arrange and position over Decor7, MCC Source:  #393d44, Target: #1c2132, Adjust> Brightness/Contrast 
Brightness: 11, Contrast: 22

Wrapping the ribbons around Décor7

Duplicate Ribbon and Lock both layers together, arrange one layer below Décor7
Activate the Decor7 layer, Select>All, Select>Float, Select>Defloat,
Activate the 2nd ribbon layer and erase parts of the ribbon.
I erased these parts.

(the purpose for the duplicate ribbon below is for drop shadow (depth), if there are those of you who do not understand how to do this, leave me a note in my shout box and I will write a tutorial on it)

Flower2: c&p, Resize 60%, Arrange and position to liking.  If you want to give it the same “wrap” effect (so to speak), as I have done, it is the same concept as the ribbons above.

p4: c&p just above your white background, Resize 110%, Desaturate, MCC Source: #2e2e2e, Target: #674c3a, name the layer Mask

Name: I made a Gradient to match the top, I have provided the gradient for you and it should be placed in the PSP Gradients Folder but it’s the first time I have tried to supply a gradient so, if it doesn’t work, this is how I made it.
Set your Foreground color to #966148, and Background to #92837c, choose Foreground/Background Gradient and click on Edit

To add these extra colors, just place your cursor below the gradient and click and “walla” you have another color Marker (those are the solid colors right below your gradient).  Enter the Location that I have provided for you.  Next, enter the color for that Marker; click on the Custom Color selection box that is just below the Location box and enter your color there.

#1 is the Foreground color: leave alone
#2 - Location: 44%, Color: #e9dcc9
#3 – Location 47%, Color:#f0e7da
#4 – Location 50%, Color: #ffffff
#5 – Location 53%, Color: #f0e7da
#6 – Location 56%, Color: #e9dcc9
#7 is the Background color: leave alone

Set this Gradient as your Foreground and Background, grab your Text tool and select Bold, Stroke width: 1, Kerning: 50.  Place the name to your liking, Convert to Raster and Duplicate.
Activate the 1st layer and apply Gradient Glow.  Choose Fat under the Color tab, enter a color of your choice for both color Markers (I chose to use #4e2f22) It’s easier to just set your foreground color to the color you want, before you open Gradient Glow
 The Color tab should look like this

The Basic tab should look like this

If you want a Drop Shadow, add it on the same layer

WSL_Mask4: Open and Minimize.  In your layers palette, activate the paper layer, right click on it and select New Mask Layer>From Image and select WSL_Mask4 from the drop menu.  Use your Pick tool to adjust the mask to your liking, Merge>Merge Group.
Add copyright and license, I suggest that you position it in a manner that it cannot be removed or tampered with, without being obvious.
Add Drop Shadows to your liking.  If you are going to be animating, make sure that you add Drop Shadows on a separate layer for the dragonfly.  If you are not going to animate, delete the white background layer, Merge Visible and save as a .png

Animation

With your Magic Wand set to these settings
Select the parts of the top that you want to add Bright Noise to.
Depending on where you are at on tube you may have to adjust your wand tolerance.  I adjusted all the way down to 0 for some areas

Once you are satisfied with your selection right click on the layer, over in your layers palette, and select Promote Selection to Layer.
My selection looked like this

Name your layer, if you would like, lock it to the tube layer and Duplicate it 3X

Activate the 1st layer and apply Bright Noise set at 15 and Mix, repeat for the 2nd – 4th layers, clicking on Mix 1X for each new layer (this gives a more subtle effect).

Again, with your Magic Wand, select the areas that you want to sparkle.  (I chose the brighter areas)
Activate the 1st layer and apply Constellation with these settings

Click on Random seed each time for the 2nd – 4th layers.

Activate your dragonfly layer, if you have not added a Drop Shadow on a separate layer, you will need your dragonfly layers locked so, right click on lock and it will put a lock only on your dragonfly.  Now, Duplicate the dragonfly 3X

With your Magic Wand set to these settings

Select the bright areas of the wings
Activate the 1st layer and apply Constellation with these settings

Click on Random seed for the 2nd – 4th layers
Select None

Now, Select the bright parts of the body
Activate the 1st layer and apply Constellation with these settings

Click on Random seed for the 2nd – 4th layers
Select None

Activate the 2nd name layer, Select>All, Select>Float, Select>Defloat, Merge Down, Duplicate 3X
Activate the 1st layer and apply Bright Noise set to 50 and Mix
Repeat for the 2nd – 4th layers clicking on Mix 2X for each layer
Select None

Merge together all of the non animated layers between the animated layers, including the Drop Shadow/s for the dragonfly, if you have one.  Duplicate each merged layer 3X
Activate your 1st background layer (the very bottom layer in your layers palette), right click, View>Current Only
Now, make ONLY the 1st layer of each group visible, right click on your visible background layer, Merge>Merge Visible. 
Make this layer invisible and make the next layer in each group visible, right click on your visible background layer, Merge>Merge Visible make this layer invisible and continue to repeat these steps until you have all of your layers merged.  View>All, Crop and save as a .psd or .psp (animation shop)…I always save as a .psd
If you wish to save as a WWO, refer back to one of my earlier tuts.

Animation Shop 3
Open your image in AS3, Select>All (Ctrl+A), Frame Properties (Alt+Enter): 13, hit Enter on the keyboard. 

Resize (Shift+S) to your liking and Optimize (Shift+Z)

And there you have it:)

I would love to see your version or results of my tut and would like to add them to my blog.  Feel free to email them to me; just make sure that you put “tut results” or something to that effect, in the subject or I will delete it without opening it


©X's & O's Dzynz and Tutorials
This Tutorial was written in November, 2011 by me, MsGoddess2U, and the concept of the tutorial is copyrighted.
See my TOU for further details

Friday, October 21, 2011

Wicked Intentions (PTU)


I wrote this tutorial using PSPX2 and Animations Shop 3
Due to my limited time, this tutorial will be written for those with a working knowledge of PSP.

I am using the awesome work of Keith Garvey.  You must have a license to use his art.  You can purchase his art at PTE

I am using a gorgeous kit by Tamie, called Evil Queen, and you can purchase it at Dreams-N-Digital

I am using template 132 by Punky Butts

Mask used is one that I made and you can get it here

Plug-ins Used:
Xero/ Porcelain & Radiance
Xenofex2/Constellation & Electrify
dsb flux/Bright Noise
Tramages/Tow The Line

Font used:
Haunted Mouse Alt

Remember to save often!!

**c&p=Copy and Paste As New Layer

**When working with duplicate layers, I always refer to them as 1st, 2nd, 3rd…and so on, working from the bottom up.

I usually keep my Drop Shadows on separate layers until I am done (or close to it anyways) just in case I want to switch something up


Open the template, duplicate and close the original.  Resize to 600 pixels wide
Resize canvas to 800X700
Activate the Background layer, make it visible and flood fill with white
Delete small circle dots

Tubes: c&p all 3 images; mirror main tube, position to liking; arrange large CU below small circle frame; rotate medium CU 10o Left and arrange below the left square frame, position to liking, duplicate and mirror.
With your Magic Wand select the transparent area to each corresponding background and hit Delete on your keyboard.
Activate the small circle CU and apply Xero>Radiance with default settings; Blend mode: Luminance Legacy; Opacity: 85%
Apply Xero Porcelain to the left and the right square tubes with these settings


Reduce Opacity to 70%

Select the papers of your choice for the Large circle, left and right rectangles, left and right large squares.

Activate right black square, rotate 10o Left, select the square with your Magic Wand and apply Tow The Line with these settings


Select None and Rotate 10o Right, Duplicate, Mirror and arrange above left square, Delete original left square

Apply Bright Noise set at 50 to all of the frames

From Tamies Evil Queen Kit

frame: c&p, Resize 50%, position over small circle, apply Brightness and Contrast both at 5.

ribboneyelets: c&p, Rotate 10o Left, position over the left side of the small square and large square (see image).  With you Lasso, select the extra ribbon and Delete.  Duplicate and mirror

swirl: c&p, Apply Brightness and Contrast with the same settings, Resize 75%, position at the bottom of the large circle frame

sparkle: c&p, Resize 80%, Rotate 15o Left, position at bottom left of left large square, duplicate mirror and position at top right corner of right large square

demonskull: c&p, Resize 40%, Rotate 15o Left, apply Brightness and Contrast both at 15, position over top left corner of left large frame

roses: c&p, Rotate 120o Right, Resize 50%, position at the top of the large circle frame, duplicate and mirror

spiderweb: c&p, position at bottom right, arrange just above the background, duplicate, mirror and flip

spider: resize 20%, rotate 15o right and position to liking on web.

Mask: open the mask and minimize.  Activate the background layer and c&p a paper and resize 115% or Open New Raster Layer and flood fill with a color of your choice.  Right click on the layer over in the layers palette and scroll up to New Mask Layer>From Image and select the mask from the drop down menu  Right click on one of the layers in the group, scroll to Merge>Merge Group.  I applied Gaussian Blur set at 4, you may or may not wish to do so.

Name: I just positioned it where I wanted it and added drop shadows both directions.  I try to keep the names simple when there are so many layers.
Now that we have the basics of our design all put together, find a good place to add the copyright and your license number. 
I suggest that you position it in a manner that it cannot be removed or tampered with, without being obvious.

Now Let’s Animate

If you want Drop Shadows, add them now; you will not need a Drop Shadow on the word art.  Make sure that the shadow/s are on a separate layer for the main tube (I did not add any shadow to the large circle dots.  If you do, put them on a separate layer too).

Activate your large circle dots, Select>All, Select>Float, Select Defloat, multiply 11X.  Activate the first layer and apply Constellation with these settings


Repeat for the 2nd through the 12th layers, clicking on Random Seed for each layer, Select>None


Activate the main tube layer; grab your Magic Wand with these settings

and select random areas of the belt buckle.  Mine looked like this


Duplicate this layer 11X.  Activate the first layer and apply constellation with these settings


Repeat for the 2nd through the 12th layers, clicking on Random Seed for each layer, Select>None


Grab your Lasso tool with these settings


select a small portion of the top of the pitch fork like this


Activate the 1st layer again; apply dsb flux>Electrify with these settings


I applied this effect to the last 5 layers (clicking on Random Seed for each new layer); it might look cool with all of the layers, I’m not sure.  Play with it and see what you like best.


Activate the “Wicked” word art layer and Merge Down to the “Intentions” layer.  Using the Manual Color Correction change the color Source: #ffffff, Target: #9d171b. Duplicate; activate the 1st layer and apply Gradient Glow with these settings, over in the color tab, just change the color to black

Activate the 2nd layer. Select>All, Select>Float, Select>Defloat, Merge Down, Duplicate 11X, activate the 1st layer and apply Bright Noise with these settings

Clicking on Mix 2X for the 2nd through the 12th layers

Merge together all of the non animated layers between the animated layers and duplicate 11X; you should have 12 layers of each group now.  Make sure all of your layers are visible before you crop, so that you don’t cut off some of your electrify effect.

Activate your 1st background layer (the very bottom layer in your layers palette), right click, View>Current Only
Now, make ONLY the 1st layer of each group visible, right click on your visible background layer, Merge>Merge Visible. 
Make this layer invisible and make the next layer in each group visible, right click on your visible background layer, Merge>Merge Visible make this layer invisible and continue to repeat these steps until you have all of your layers merged.  View>All and save as a .psd or .psp (animation shop)…I always save as a .psd

If you are saving as a WWO, you know what to do…if you don’t, refer back to one of my earlier tuts


Animation Shop 3
Open your image in AS3, Select>All (Ctrl+A), Frame Properties (Alt+Enter) and change the value to 13, hit Enter on the keyboard. 

Resize (Shift+S) to your liking and Optimize (Shift+Z)

And there you have it:)

I would love to see your version or results of my tut and would like to add them to my blog.  Feel free to email them to me; just make sure that you put “tut results” or something to that effect, in the subject or I will delete it without opening it


©X's & O's Dzynz and Tutorials
This Tutorial was written in October, 2011 by me, MsGoddess2U, and the concept of the tutorial is copyrighted.
See my TOU for further details

Wednesday, August 31, 2011

Hot & Dangerous (PTU)


I wrote this tutorial using PSPX2 and Animation Shop 3

This tut is written for those with a working knowledge of PSP and AS3 (Although, I do try to write them in a way that, those of you who are new, can understand and follow them too).

I am using a hot tube by Ziata_M called Dancing Queen; you must have a license to use her art.  You can purchase it at PicsForDesign.com

I used 2 awesome kits by Tamie, Get Punked and RebelDoll and you can purchase them at Dreams-N-Digital

Template 2deb&Kat Collab 2011 from Creative Misfits

Mask by Vaybs, DBVGrungyMisfitsmask3 also at Creative Misfits
Resize Canvas

Plug-ins Used:
dsb flux / Bright Noise
Eye Candy 4000 / Gradient Glow
Eye Candy 5 Impact / Glass
Xenofex 2 / Constellation
Xero / Radiance

Fonts used:
Pussycat
Kosal says hy

**c&p=Copy and Paste As New Layer (I always c&p as a top layer, so I can see what I’m doing, then arrange the layer where I want it)

**When working with duplicate layers, I always refer to them as 1st, 2nd, 3rd…and so on, from the bottom up.

Remember to save often!!

Open the template and Duplicate (Shift+D) and close your original
Delete the word art and the 4 small hearts, which is Raster 1 and all the copies of it.

Resize Canvas to 800 X 750 like this

Open New Raster Layer and arrange at the bottom and flood fill with white and name it background

Grab your pick tool and activate the black rect layer and change the Position Y value to 364

Activate the pink rect frame and change the Position Y value to 360

Duplicate the rectangle and Rotate 90o Left.  Set 2 vertical guides; 1 at 84 and the other at 714 (if you do not know how to set your guides at a specific value, just get it close and right click on your guide, up in your ruler section, and a box will open up for you to enter the value that you desire; click OK and it will move). 
Grab your pick tool and pull both sides out to the guides, Delete guides, name the layer rectangle2.

Select>All, Select>Float, Select>Defloat, Select>Modify>Select Selection Borders with these settings


Open New Raster Layer and Flood Fill selection with a color of your choice, you can always change it later with the Manual Color Correction tool too.
Repeat above steps for rectangle and concave square

Tube and CU: c&p both and mirror the CU. Or in this case, just copy the tube/s that you want and resize one, as the main tube, by 45%.  I used one of the images with a darker shirt for the CU

Position your CU to your liking over the concave square.  Activate the concave square layer and, with your Magic Wand (with Feather set to 0), click on the transparent area of the layer.  Activate the CU and hit Delete on the keyboard and reduce the opacity to 44%, Duplicate and apply Xero / Radiance with default settings to the 2nd layer.  Set the Blend Mode for the 1st layer to Luminance (L), leave the 2nd layer at Blend Mode: Normal, Merge Down your 1st layer onto the concave square and then the 2nd one

I used my papers from the Get Punked! Kit

Activate the rectangle layer and click on the transparent area, with your Magic Wand, c&p a paper of your choice, hit Delete on the Keyboard and Select>None.  Repeat for rectangle2 and black rectangle

New word Art: Pussycat font, font size to your liking; I have 85, Anti-Alias: Smooth, Stroke Width: 0, Create as Vector, Line Style: solid line, Leading:-0.550, Kerning:60 Background color of your choice
Activate the pink rect frame
In your text box, Hot (Enter) & (Enter) Dangerous, center within the pink frame and position your text tool over your text and click on it when you see this symbol [A], now just space them out so that they stretch across the rectangle, leaving a little room for the text border.  Convert to Raster, Apply Bright Noise at 100 and Mix.  Select>All, Select>Float, Select>Defloat, Select>Modify>Select Selection Borders and change the value to 1, Activate your main tube, open New Raster Layer, and flood fill your selection with a color of your choice, Drop Shadows: make sure you tick the box Shadow On New Layer.
these are not the settings I used, 
this is a common screen shot


From the RebelDoll Kit

Activate your background layer, right click on it, in your layers palette, and select View>Current Only

Wire: c&p, Resize 130%, Duplicate and Merge the 2 wire layers together, now duplicate and line up until you have a full sheet, like this

You may have to erase a little here and there but don’t concern yourself with the center of it.
Merge all your wire layers together and name the layer wire
Right click on any layer, in your layers palette and select View>All
Activate the background layer and Select>All, Image>Crop to Selection, Select>None

Chain: c&p, Resize 80%, position over pink rectangle frame at the top, Duplicate, Flip and position over the frame on the bottom, Duplicate again and Rotate 90o Right, position over right side of the pink rectangle frame, Duplicate and Mirror (You want to do them in this order, due to the Drop Shadow that is already on it).  You may need to move them around a little to get the corners the way you want them…I would recommend using the Pick tool to do it, since it is more precise. 
Don’t focus on the bottom corners, they will not show.  Once you are satisfied with your chain frame, Merge the 4 layers together and name it chain frame, Delete the pink rectangle frame.  If you add Drop Shadows, add it/them on a separate layer

Grab your Magic Wand with these settings

And click inside the frame, Select>Modify>Expand:3, Select>Invert, activate the paper layer below it and hit Delete on the keyboard

Roses: Open and Duplicate (Shift+D), close original, Select the blue part of the rose bud, something like this

Desaturate

 Manual Color Correction tool Source: #8c8c8c, Target: #790550, Select>None
Rose stems and leaves: Use you Magic Wand with these settings 

and select the stems and leaves like this


Manual Color Correction tool Source: #535353, Target: #01e923.
If you are a perfectionist, like I am, you are going to see 2 of the tips of the black leaves that come up the rose buds that will not change color (not for me anyways)  don’t waist your time on them…you won’t be able to see them anyways.
 Select>None, c&p (close the Duplicate without saving), Resize 80 %, Rotate 45o Left, position to the bottom left, arrange down just above the chain frame, Duplicate, Mirror and arrange above the Hot & Dangerous outline

Heartwithwings: c&p, Resize 60%, Rotate 15o Right, position at bottom arrange just above your 1st roses layer

Bow4: c&p, Resize 75%, Rotate 25o Left, position at upper left corner of rectangle2 and arrange just above the 1st roses layer; Drop Shadows can be added on the same layer

Rose: c&p, with your Magic Wand set to these settings

Select all of the rose and Desaturate, Manual Color Correction tool Source: #868686, Target: #b81187, Invert Selection and apply Brightness and Contrast with these settings

Then apply Bright Noise set at 60 and Mix, Select>None
Resize 75% position to right and arrange just above bow4 layer, Drop Shadow/s can be added on same layer

Kiss: c&p, Resize 55%, Rotate 25o Right, apply Bright Noise set at 30 & Mix, Apply Gradient Glow; under the Color Tab, choose Fat and under the Basic tab, use these settings

Select>All, Select>Float> Select>Defloat, Select>Modify>Expand: 1, Open New Raster Layer and apply Eye Candy 5 Impact / Glass, with these settings


Merge this layer down on to the kiss, Drop Shadow/s on same layer

Screw: c&p, Desaturate, Manual Color Correction tool Source: #868686, Target: #35b839, Resize 25%, Duplicate as many times as you like, position and arrange to your liking.  I rotated each one with a random degree too

Ribbon5:c&p, Rotate 35o Right, position to the right and arrange just above the concave square frame, Drop Shadow/s on separate layer and, if you have 2, merge them together

Ribbon wrap: Duplicate ribbon5 and arrange just above the 2nd roses layer.  If you added a Drop Shadow to the first layer, your 2nd ribbon layer will automatically be locked to the 1st one.  If you didn’t, then lock these 2 ribbon layers together.  Activate the roses layer, Select>All, Select>Float, Select>Defloat, you may have to move your ribbon around a little to find a good spot for the wrap, grab your Eraser brush and erase these parts

Select>None and Erase the remainder of the ribbon, making sure to erase any little spikes like this
With these eraser settings


name the layer Ribbon Overlay

If you have a shadow on your ribbon and want to copy it under your ribbon overlay, follow these instructions.

First, if you have 2 shadows on your original ribbon layer, merge them into one.  Activate the Ribbon Overlay layer and Select>All, Select>Float, Select>Defloat, grab your Lasso tool and you will have to use Point to Point and Remove and Add to get your selection but you will want it to look like this


Activate your ribbon shadow layer and Copy, activate your 2nd roses layer Open New Raster Layer, Edit>Paste Into Selection, Select>None and grab your Eraser with these settings


And erase the extra shadow just moving in a little bit at a time until you have the desired amount of shadow.  Once you are satisfied with your shadow, you can merge your ribbon overlay down onto the shadow and then down onto the roses

Netting: c&p, Rotate 90o Left, Flip, Resize 87%, arrange down to just above your rectangle paper layer, position to liking, activate your rectangle paper layer, grab your Magic Wand and click on the transparent part, activate the netting layer and hit Delete on your keyboard, Select>None, Drop Shadow on the same layer

Netting2: c&p, arrange below Rectangle2 and position

  Mask: Open Vaybs’ mask and minimize, activate your white background, Open New Raster Layer and flood fill with a color of your choice, right click on that layer, over in your Layers Palette and scroll up to New Mask Layer>From Image and select your mask from the drop down menu


Name: Draw a Circle Vector just below the netting2 layer so that you can see the edges, like this

Open New Raster Layer at the top; select your text tool with these settings


(Offset controls the distance of your text from the vector)
position your text tool at the edge of the circle until you see an A with a rocker underneath it, like this

Left click to open your text box and type out your name.  You can put your cursor before your name or after it and use the space key to move your name one direction or the other around the circle. 

Once you are satisfied with the position of your name, Convert to Raster, Duplicate and Delete Vector (if you are saving as a WWO, just arrange the layer to the bottom, below the background).

Activate the 1st layer and apply Gradient Glow with the same settings as kiss (You may add drop shadows to this layer, on the same layer, if you so choose).  Name the 1st layer Name Background and the 2nd just Name

Now, activate your wire layer and grab your Eraser at any size you choose, Hardness, Density, Thickness and Opacity set to 100 and start erasing to your liking. I added a drop shadow on the same layer.

Find a good place for the copyright and your license #.  I suggest that you place it in a way that it can not be removed or altered without being obvious.  A slight Gradient Glow with a light color will help in making your info more visible.


Now Let’s Animate

Activate Rectangle2 Frame and Select>All, Select>Float, Select>Defloat, Merge Down to the background layer, Duplicate 3X
Your layers should look like this

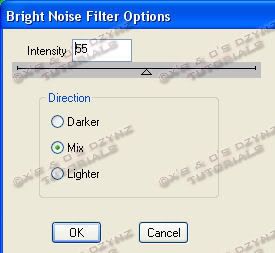
activate the first layer and apply Bright Noise with these settings
(I used black so my settings are high, you may want to use a lesser value if you used a different color)

click on Mix 2X for the 2nd through the 4th layers

Repeat the same steps for the rectangle frame, merging down to the last layer above your last merged layers, like this

Using these settings


click on Mix 2X for the 2nd through the 4th layers

Again for the Concave Square Frame, same settings, layers look like this
(don’t mind the weird layer names, it’s just my way of keeping track of what I do)


activate the chain frame layer and grab your Magic Wand with these settings


Select the bright parts of the chain like this


Merge Down to the concave square frame merged layers and Duplicate 3X, like this

Activate the 1st layer and apply Constellation with these settings


Clicking on Random seed for the 2nd through the 4th layers

Now Merge together all the layers between these last layers and your tube, Duplicate 3X

Duplicate the Main Tube 3X, activate the 1st layer and, with your Magic Wand at these settings

Select random parts of the earring and apply Constellation with these settings


Clicking on Random seed for the 2nd through the 4th layers

Activate the 1st layer again and, with your Magic Wand, select the bright parts of the gold bracelet and apply Constellation with these settings


Clicking on Random seed for the 2nd through the 4th layers

Activate the word art outline, Select>All, Select>Float, Select>Defloat, merge down onto outline shadows, Duplicate 3X, activate 1st layer and apply Bright Noise with these settings

click on Mix 2X for the 2nd through the 4th layers

Activate the name, Select>All, Select>Float, Select>Defloat, Merge Down to the word art outline, Duplicate 3X like this

Activate the 1st layer and apply Bright Noise with the same settings and following the same steps, Select>None

Activate your 1st background layer (the very bottom layer in your layers palette), right click, View>Current Only
Now, make ONLY the 1st layer of each group visible, right click on your visible background layer, Merge>Merge Visible. 
Make this merged layer invisible and make the next layer in each group visible, right click on your visible background layer, Merge>Merge Visible make this layer invisible and repeat these steps for the next 2 layers in each group
View>All, Crop, Resize to your liking and save as a .psd or .psp (animation shop)…I always save as a .psd and a .pspimage (for the WWO’s)
OR
you can copy (Ctrl+C) your 1st layer and Paste As New Animation (Ctrl+V) in AS3, Copy your 2nd layer and Paste After Current Frame (Shift+Ctrl+L) and repeat with your 3rd and 4th layers but I have had some get all screwed up that way, so I prefer to just save it and open in AS3

If you are saving as a WWO, you know what to do…if you don’t, refer back to one of my earlier tuts


Animation Shop 3

Open your image in AS3, Select>All (Ctrl+A), Frame Properties (Alt+Enter) and change the value to 13, hit Enter on the keyboard.  and Optimize (Shift+Z)
Well…a lot of animation but we are finally done!
I would love to see your version or results of my tut and would like to add them to my blog.  Feel free to email them to me; just make sure that you put “tut results” or something to that effect, in the subject or I will delete it without opening it


I did not intend for this tut to be so long...lol

©X's & O's Dzynz and Tutorials
This Tutorial was written in August, 2011 by me, MsGoddess2U, and the concept of the tutorial is copyrighted.
See my TOU for further details