(wing animation not included)
I wrote this tut using PSPX2 and Animation Shop 3.
This tut is written for those with a working knowledge of PSP and AS3.
I am using the awesome artwork of Elias Chatzoudis. You must have a license to use his work and you can purchase his work and get your license at PTE
I am using another gorgeous kit by Tamie called Kayla and you can purchase it at Dreams-N-Digital
The Mask I am using is, again, one of my first, you may use another mask of your choice or you can use this one. I am having trouble uploading it to MediaFire so you can just right click on it and save it
Plug-ins Used:
dsb flux / Bright Noise
Eye Candy 4000 / Gradient Glow
Xenofex 2 / Constellation
Tramages / Tow The Line
Font Used:
Fairydust
This one is going to be fairly simple, compared to my last few.
**c&p=Copy and Paste As New Layer (I always c&p as a top layer so I can see what I’m doing, then arrange the layer where I want it)
**When working with duplicate layers, I always refer to them as 1st, 2nd, 3rd…and so on, from the bottom up.
Remember to save often!!
Open New Image (File>New) Width: 900, Height 750
This will give us a little working room, you can crop and resize later
Flood Fill with white and name it Background
We are going to get the tube, CU, and Frame in position first
Tube & CU: c&p both, Mirror the CU, Activate the main tube and, with your Pick Tool, change Position X to: 449 and Position Y to: 109 (you might want to reduce the opacity, while we work around the frame)
From Tamies Kit:
Activate your CU layer
Frame3: c&p, resize 80%, grab your pick tool and just change Position X to: 110 and Position Y to: 157
Resize the CU by 110%, position to liking within the frame, Duplicate, change the Blend Mode on the 1st CU layer to Luminance (L) and reduce Opacity to 46%
Activate the 2nd CU Layer and apply Xero / Radiance with the default settings and reduce Opacity to 63%
Activate your frame layer and, with your Magic Wand, click inside the frame, Expand by 2, Invert Selection, Activate the 1st CU layer and hit Delete on your keyboard, repeat on the 2nd CU layer.
DO NOT SELECT>NONE
Activate your background layer, c&p a paper of your choice (I used p11) hit Delete on your keyboard, Duplicate, Invert Selection and apply Tow The Line, to the 2nd paper layer, with these settings
With your selection still active, Mirror. Your mirrored heart is now floating; Select>None
We now have a hard line at the bottom her jaw bone
Grab your Eraser with these settings
And go along the line and just soften it up like this
I also reduced my Eraser size and erased the lines on the eyelid and down the side of the nose.
Merge this layer down onto the 1st paper layer and then Merge Down the 1st CU, followed by the 2nd CU. Make sure you follow this order.
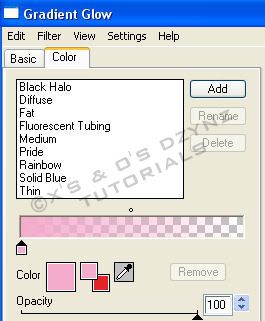
Glitter: c&p, Resize 130%, position to liking, mine is at Position X: 66, Position Y: 70, Duplicate, activate the 1st layer and apply Gradient Glow with these settings
Décor: c&p, Rotate 150o Left, position to liking and arrange just above the 2nd glitter layer, Duplicate, Mirror and position in to the other side of the frame. Once you are satisfied with the positioning, merge these 2 layers together and apply Gradient Glow with these settings, Color: #783f6c
Flowers2: c&p, Resize 65%, position to liking at the top of the frame and arrange the layer above the décor layers, Duplicate, Mirror and position
Heartbeads: c&p, Resize 70%, position to liking, arrange layer above the heart frame
Beads: c&p, Resize 80%, Mirror, position to liking and arrange above heartbeads.
Pearlsonstring: c&p, Resize 80%, position to liking and arrange above Beads
Berries: c&p, Resize 60%, Rotate 35o Left, position at bottom left of frame, arrange above pearlsonstring, duplicate and position on bottom right of frame.
Flowers: c&p, Erase stem, Resize 50%, Flip, Mirror, Rotate 15o Left, position and arrange over the berries at bottom left of frame.
Apply Brightness/Contrast with these settings
Duplicate, Mirror, position at right side of frame
Rose: c&p, Resize 60%, arrange above the Flowers layers and position at the bottom center of the frame
Butterfly2: c&p, Mirror, Resize 60%, position to liking and arrange above the rose layer
If you reduced the opacity of the main tube, return it to 100% now
Sparkles: c&p, position over your elements on the left, Duplicate and position over the main tube across the legs and up to wings
I erased the sparkles that overlap and a few more here and there. Anything that is over the white background is not going to show, so don’t worry about that…once you are satisfied with your sparkles. Merge the 2 layers together
(we are going to apply constellation to the sparkles)
Name:
Set your Foreground color to #95237e, and your Background to #da54a9, then go into your Materials options, click on the Gradient tab and choose Foreground/Background Gradient. Use the settings I have here and then click on your Edit Box.
On the top slide bar, from left to right, slide your 1st color to 8% (there is a location box right there that will tell you where you are at). On the far right, slide that color to the left to 73%. Now, add a new color by clicking right below the slide bar and slide that color all the way down to 100%. Click on the color box that is right below the location box and change that color to #f4b3d1. You will need to save it and name it (I exported mine but it still uses the colors that you have in your foreground and background…hmmmmm)
I also chose Bold for my font
Type out your name, click on apply, Convert to Raster and Duplicate
Activate the 1st name layer; apply Gradient Glow with these settings
I also added a Drop Shadow with these settings
Activate your background layer and open New Raster Layer, flood fill with a color from your design
Open my mask and minimize. Right click on the new flood filled layer and scroll up to New Mask Layer>From Image, choose your mask from the drop down menu
Your mask layer should be the one that is active, in the group. Keep this layer active and use your pick tool, set to Scale, to adjust the mask to your liking.
Now that we have the basics of our design all put together, find a good place to add the copyright and your license number. I suggest that you position it in a manner that it cannot be removed or tampered with, without being obvious.
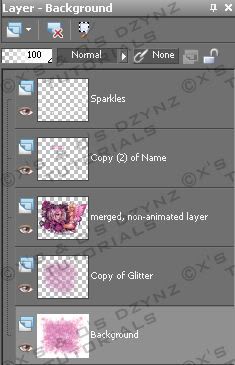
Arrange the layer so that it can be merged with the non-animated layers; we are going to animate the glitter, sparkles and name layers Merge together all the non-animated layers that are in between the animated layers
Your Layers Palette should look like this
Lets Start Animating
Activate the 2nd glitter layer (the 1st one, with the Gradient Glow, should be merged down onto the background), Duplicate3X
Activate the 1st layer and apply Constellation with these settings
Repeat on the 2nd through the 4th layers, clicking on Random seed for each new layer
Activate the sparkles layer, Duplicate 3X, activate the 1st layer and apply Constellation with these settings
Repeat on the 2nd through the 4th layers, clicking on Random seed for each new layer
Activate the 2nd name layer (the 1st one with the Gradient Glow, should be merged down with the non-animated layer), Duplicate 3X, activate the 1st layer and apply Bright Noise with these settings
Repeat on the 2nd through the 4th layers, clicking on Mix 2X for each new layer
Activate your 1st background layer (the very bottom layer in your layers palette), right click, View>Current Only
Now, Duplicate your non-animated layers 3X, so that you have 4 layers of every group. Make ONLY the 1st layer of each group visible, right click on your visible background layer, Merge>Merge Visible.
Make this merged layer invisible and make the next layer in each group visible, right click on your visible background layer, Merge>Merge Visible make this layer invisible and continue to repeat these steps for the next 2 groups of layers
View>All, Crop, Resize to your liking and save as a .psd or .psp (animation shop)…I always save as a .psd
If you are saving as a WWO, you know what to do…if you don’t, refer back to one of my earlier tuts
Animation Shop 3
Open your image in AS3, Select>All (Ctrl+A), Frame Properties (Alt+Enter) and change the value to 13, hit Enter on the keyboard. and Optimize (Shift+Z)
Now see…wasn’t that one a lot more quick and easy??
I would love to see your version or results of my tut and would like to add them to my blog. Feel free to email them to me; just make sure that you put “tut results” or something to that effect, in the subject or I will delete it without opening it
©X's & O's Dzynz and Tutorials
This Tutorial was written in July, 2011 by me, MsGoddess2U, and the concept of the tutorial is copyrighted.
See my TOU for further details
See my TOU for further details


No comments:
Post a Comment