

I wrote this tutorial using PSPX2 and Animation Shop3
I have to tell you up front that I really stepped out of my comfort zone on this one…this is not my usual style and it is an attempt to expand my creativity and skills and not be stuck in one style. I am open to constructive criticism, you can leave me a comment and tell me you think it is hideous or that you like it…whatever you have to say about it, I can take it; don’t be afraid of hurting my feelings…I got my big girl panties on;) Either way, I would appreciate feedback on it though.
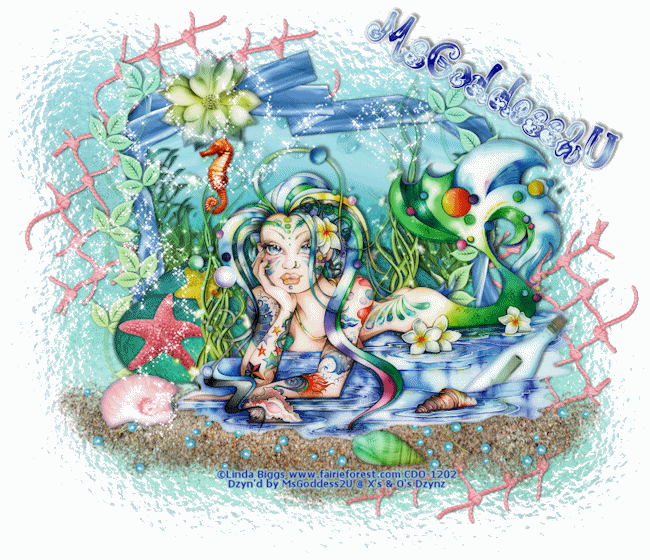
I am using a beautiful tube by Linda Biggs; you must have a license to use her art and you can purchase her art at CDO
I am using yet another awesome kit by Tamie, called Mermaid, and you can purchase it at Dreams-N-Digital
Plug ins used:
Eye Candy 4000/Gradient Glow, Glass & Jiggle
Xero/Radiance & Porcelain
Xenofex 2/Constellation
Font Used:
Bajareczka
**c&p=Copy and Paste As New Layer
**When working with duplicate layers, I always refer to them as 1st, 2nd, 3rd…from the bottom up
A couple quick things before we begin
Desaturate: Adjust> Hue and Saturation>Hue/ Saturation/Lightness

Manual Color Correction: If you do not know what it is or where to find it, there is a tut on it here.
Let’s try this now…
Open New Image, Transparent, 850 X 750, flood fill with white
Tube:c&p
p1: c&p below tube layer, Resize 125%
Activate the white background layer and Select>All, Image>Crop To Selection,
Duplicate the paper layer; name the fist layer Mask and hide it for now, we are going to use it much later.
sea: c&p, resize 125%, leave it where it is at the moment.
bubbles: c&p, resize 75%,
frame: c&p, desaturate, Manual Color Correction Source: #a9a9a9, Target: #74a8d9, Resize 85%, Mirror, position to liking, arrange layer above your bubbles layer.
Grab your magic wand and click on the inside of the frame, Selections>Modify>Expand:4, Invert, activate your 2nd paper layer and hit Delete on keyboard,
Position your sea layer to your liking, mine is at the top of the frame, once you have it where you want it, hit delete
Position your bubbles to your liking, hit delete, Select>None.
flower2: c&p, resize 40%, position and arrange layer over your frame
seaweed3: c&p above the sea layer, Resize 70% and position within the frame. You shouldn’t have any seaweed outside of your frame but, if you do, just erase it or activate your paper layer, click on the outside transparent area, activate your seaweed and Delete.
sand: c&p, rotate 10o left, duplicate, mirror, arrange these layers below your rock layer and position to liking, I didn’t merge them because I played with them as I went along.
pearls: c&p, resize 75%, duplicate, mirror and position over the sand to your liking
rocks: c&p, Mirror, position behind tube, arrange the layer above the frame
starfish2: c&p, Resize 50%, position over rock
starfish3: c&p, Resize 30%, Desaturate, Manual Color Correction Source: #8b8b8b, Target: #eedc36, position over rock
I added drop shadows to my starfish and merged them down onto the rocks and then resized 90%
decor2: c&p, Resize 50%, arrange above the rock layer duplicate, mirror and position both to liking, apply Xero/Porcelain with these settings

seahorse: c&p, Desaturate, Manual Color Correction Source: #c0c0c0, Target: #c0c0c0. Resize 30%, position and arrange layer above the decor2 layer, activate decor2 layer, Select>All, Select>Float, Select Defltoat, activate your seahorse layer and erase just a little of his tail so that it appears to wrap around the décor. Apply Xero/Radiance with default settings
leaves: c&p, resize 75%, position to the left of the frame, arrange below the rock layer, duplicate and position to your liking on the other side of the frame
shell: c&p, resize 50%, rotate 45o left, positon to liking
shell2: resize 40%, position to liking
bottle: c&p, resize 50%, rotate 45o right, position over a ripple in the water and reduce the opacity so that you can see the ripple and still see your bottle, like this

grab you eraser brush with these settings

Erase the portion of the bottle that is below the ripple and over the shell. This may take a little practice to get it just the way you want it. Once you are satisfied, return the opacity to 100%
You can give your bottle a drop shadow as long as your vertical value is 0 or a negative number
net: c&p, move up to the left corner and arrange just above Mask layer, mirror, flip and position to liking
duplicate the tube and apply Xero/Radiance with these settings

and then Xero/Porcelain with these settings

reduce the Opacity to 60 and Merge Down
I applied a drop shadow to the tube and I didn't want the shadow as strong around the water so I used my eraser on the shadow with these settings

While you have these Porcelain settings, apply to flower,sea, and both of the shells, the bottle and seaweed3.
sparkles2: c&p, flip, position to liking
Now that we have everything where we want it, unhide your Mask Layer and grab your Lasso tool, Selection type: Point to point, Mode: Add, Feather:0, Smoothing: 0, Anti-alias checked, and draw an uneven selection around your image, invert, and hit delete, Select>None
Apply Eye Candy 4000/Jiggle with these settings


You may have to play with this a little to get what you want, you want to be careful that your edges don’t exceed your canvas or you are going to have cut off, blunt edges and we DON’T WANT THAT!!
Name: set your Foreground: #040887, Background: #ccecea, Choose the foreground/background gradient, Angle: 156, Repeats 13, set it as your background and make your foreground transparent. Type out your name, click apply and rotate 30o right. If you would like to go back and add different name later, name this layer Name Vector, duplicate and convert to raster and hide your name vector.
Unfortunately, I discovered that this particular font defaults to Arial, every time I duplicate the Name Vector and try to change the name. It does still keep your gradient settings and your angle though. You may want to find another font to use. I scrolled through over a thousand and couldn’t find one that I liked as well as…I’m hooked on this one for this tag. All you have to do though, once you’ve typed out the name, is highlight the name and select that font again…pain in the ass, I know! If anyone knows why this particular font is doing this, please share your knowledge!
Apply eye Candy 4000/Gradient GlowGradient Glow to your duplicate layer that you converted to a raster. Under the Color tab choose Fat and use these settings under the Basic tab

Apply Eye Candy 4000/Glass with the glass color set at #a2dbe3 and these settings


Add the artist's copyright and your license info and add a light Gradient Glow to make it stand out better. I suggest that you place this in an area of your design so that it can not be removed or altered without being totally obvious
Add any Drop Shadows that you may want to any of the elements. I’m like this Drop Shadow freak. Almost everything has some kind of drop shadow, even if the opacity is only 10…lol
Animation
This one is going to be so easy!
Make your sparkles2 layer invisible. If you want to go back and add a different name later on down the road, you want to make your name layers invisible too; if not, delete that name vector layer and keep your name visible too. Activate any one of your layers below the sparkles2 layer, right click on it, in the layers palette and Merge>Merge Visible and now your layers palette should look something like this


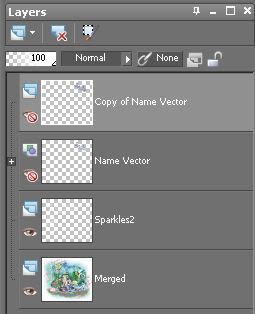
Duplicate your Merged background and your sparkles2 layer 3X so that you have 4 layers of each (I chose to go with 4 because I liked the way the Constellation turned out…you can do 3, if you want)
Activate your 1st sparkles2 layer and apply Xenofex2/Constellation with these settings

Repeat for the 2nd, 3rd & 4th layers, clicking on Random Seed for each new layer.
Activate your first layer and arrange it above your 1st Merged layer, repeat for the 2nd, 3rd & 4th layers
Merge Down each sparkle layer to the merged layer below it.
This is where I save as a .psp for WWO’s
Add your name, with or without drop shadows, to each layer
Crop and resize to your liking
Animation Shop 3
Save as a .psd or a .psp(animation shop) and open in Animation Shop 3 or copy your 1st layer and Paste As New Animation, in AS3, Copy your second layer and Paste After Current Frame and repeat for the 3rd and 4th layers.
Select All (Ctrl+A), Frame Properties (Alt+Enter)=13, Optimize (Shift+Z)
©X's & O's Dzynz and Tutorials
This Tutorial was written in April, 2011 by me, MsGoddess2U, and the concept of the tutorial is copyrighted.
See my TOU for further details
See my TOU for further details
No comments:
Post a Comment