

I wrote this tut using PSP and Animation Shop3 (and a regular keyboard because I fried mine with coffee…these things are cramped and hard to use!)
This tut is written for those with a working knowledge of PSP and the specific plugins used. It is going to be long enough as is. There are going to be a lot of layers! If you ARE new at this and have any problems or questions, feel free to leave me a message in my comments box or email me (make sure you have something like “Question about your tut” in the subject or I may not even open it). I will do my best to walk you through it;)
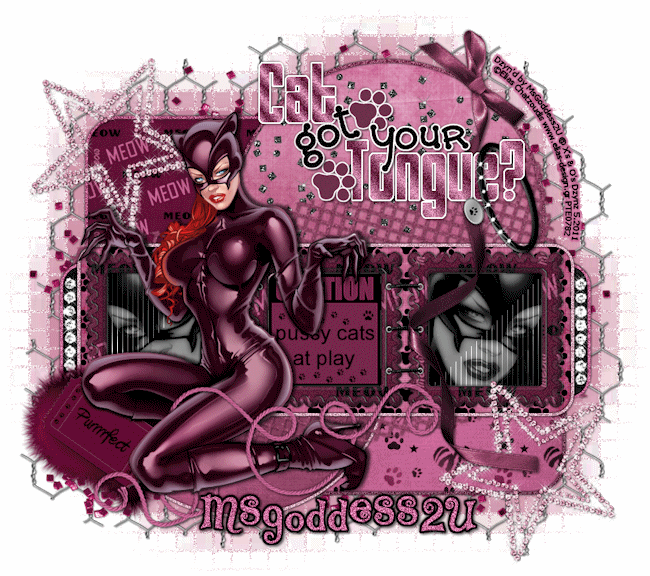
I am using the awesome work of Elias Chatzoudis; you must have a license to use his art; you can purchase his work at PTE
I am using a fabulous kit “Meow” by Tamie! You can purchase it at Dreams-N-Digital
Template used is one I created for this tag, you can get it here
Plugins used:
Tramages / Tow The Line
Xenofex2 / Constellation
dsb flux / Bright Noise
Font used:
TS Curly
**c&p=Copy and Paste As New Layer
**When working with duplicate layers, I always refer to them as 1st, 2nd, 3rd…from the bottom up and 4th in this case
Open the template, Duplicate (Shift+D) and close the original and delete the credits layer.
Activate Rectangle1 layer and click on the transparent area with your Magic Wand, c&p a paper of your choice and hit delete on the keyboard
Repeat these steps for Rectangle 2, Circle, Half Circle, Rectangle 3 (I resized my paper for this rectangle by 105%) and Rectangle 4. For the Circle and Rectangle 4, I chose a second paper as well and changed the blend mode to Soft Light.
frame3: c&p above the Rectangle4 frame, Resize 90%, position within the frame.
With your Magic Wand, click inside each square in the frame and expand your selection by 2. Open a new Raster Layer below your frame and flood fill your selection with black.
Keeping your selection, apply Tramages / Tow The Line with these settings

Select>None
Now grab your rectangle selection tool and draw a selection around your right hand black box for your frame background and hit Delete.
Using the same tool, draw a selection around your left hand box (making sure that you have all of it), Copy, Open New Raster Layer, Paste Into Selection, Select>None, Mirror and Flip and position within the right hand side of the frame, once you’re satisfied with where you have it, Merge Down.
CU: c&p, position to liking within the left or right of the frame, Duplicate, Mirror, Merge Down.
Activate your black frame background, click on the transparent area with your Magic Wand, activate your CU layer, Delete, Select>None.
Apply Xero / Radiance with default settings
Then apply Xero / Porcelain with these settings

Change your blend mode to Luminance (Legacy) and reduce opacity to 60%
sign: Resize 55%, position in the middle square of the frame, Change
Blend Mode to Luminance (Legacy). Duplicate, change Blend Mode to Normal and reduce Opacity to 73%
Merge your 1st sign down with your CU layer, Merge your CU and sign down onto the background and then Merge Down your 2nd sign.
Main tube: c&p, position to liking
mesh: c&p right below the Rectangle3 layer, Resize 110%, Rotate 10o Left
glitter: c&p above your paper layers for your circle, position to liking, activate your circle layer, grab your Magic Wand, click on the transparent area, activate your glitter layer, Delete, Select>None.
star: c&p just above the Rectangle4 Frame Layer, resize 50%, Rotate 25o left, Adjust>Sharpness>Sharpen More, position bottom right, Duplicate, Mirror, position top left, Merge Down
fluffy heart: c&p, Mirror, position to bottom left of frame
ticket2: c&p, Resize 50%, Rotate 35o Right, Sharpen, position over the fluffy heart
ribbon2: c&p just below the Tongue Background layer and position to liking
string: c&p above your main tube layer, Rotate 35o Left, Desaurate, Manual Color Correction Source: #6a6a6a, Target: #c36292, position to liking, Duplicate and arrange the 2nd layer just above the ticket layer (this is now actually your 1st layer and the other is your 2nd)
Activate your main tube, Select>All, Select>Float, Select>Defloat
Activate your 2nd rope layer and erase the parts of the rope that you don’t want over your tube to give it a wrap around look. Select none and erase the rest of the string on your 2nd layer that you don’t need. Make sure, if you have drop shadows on your main tube, that you leave enough string to cover the drop shadow for the pieces that are over the tube and make sure you erase the parts of the string that are below your tube’s shadow so that the shadow shows. I erased the end of the rope that extended beyond the ribbon and under the star too (it got too busy around the star)
I wasn’t going to go into much detail on this but…in order to get the string to look like it is wrapping around the leg, like I have, reduce the opacity so that you can see the edge of her leg and set your eraser brush to these settings

erase the string right at the edge of the leg

return the opacity to 100%
diamonds: c&p as your top layer, Rotate 90o Right, position in the area that is between Rectangle3 and Rectangle4 Frames; arrange the layer so that it is just above the Rectangle3 paper. Position so that they fit and either erase or freehand select and cut the remaining diamonds, Duplicate and Mirror…you may have to adjust this layer a little so that it is symmetrical.
collar: c&p above the Tongue layer, Resize 45%, Rotate 70o Right, Sharpen, position to liking, duplicate and arrange the duplicate layer below your Tongue Background layer or the background shadow, if you are using one (I included drop shadows in my template on separate layers so you can choose to use them or not)
Activate the Tongue Background layer, Select>All, Select>Float, Select>Defloat
Activate your 2nd collar layer and erase the part of the collar that you don’t want over the word.
wire2: c&p above the mask layer, Resize 140%, now grab your eraser brush and start erasing around your image so that you have something that is to your liking. Apply Brightness and Contrast with these settings

glitter2: c&p as the top layer so that you can see what you are working with. Duplicate and mirror and duplicate and flip, rotate some, whatever you want to do to get the look you think you want behind your design. Arrange the layers down to just above your wire and play around with them, if need be, til you have what you want and then merge your glitter2 layers all together.
I saved my frame colors for last. Just use your Manual Color Correction tool and change them to the colors of your choice.
Name: set your foreground to black and your background to a color of your choice.
Stroke Width: 0, Kerning: 50,
Convert to Raster, Select>All, >Select>Float, Select>Defloat, Expand selection by 3, open New Raster Layer below your name and flood fill with black.
I added drop shadows (both directions) to make it “pop out” a little more (I add drop shadows to everything anyways…lol).
Add your copyright and license. I suggest that you place it in a way that it can not be removed or altered without being obvious
Animation Time
If you are adding Drop Shadows to anything that you are animating, make sure you do this BEFORE adding the animation and check the box Shadow on new layer; like this

Now, make Visible Only the layers between the each layer that you are going to animate, including the Drop Shadows for that animated layer and Merge Visible.
We are animating, the stars, diamonds, collar, cat, tongue, all the frames and the name. If you have a drop shadow that you copied and pasted for the part of the collar that is over the word Tongue?, go ahead and merge this shadow to the collar (there’s always an exception to every rule;)
Duplicate all your frame layers 3X
Starting with your Rectangle1 Frame, activate the 1st layer and apply Bright Noise with these settings

Click on Mix 2X for the 2nd, 3rd & 4th layers
Working your way up, repeat these steps for all of the frames
Duplicate your Tongue Gradient Fill layer 3X, activate your 1st layer and apply Bright Noise with these settings

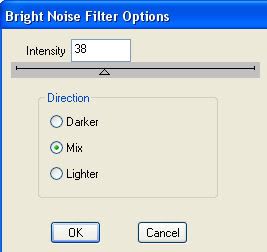
following the same steps as before for your other layers.
Repeat these steps for the Cat Gradient Fill layer
Activate the second collar layer (the one that is over the word Tongue?) Duplicate 3X and grab your Magic Wand with these settings

Select all the little silver studs on the collar.
Activate your 1st layer and apply Constellation with these settings

Click Random seed for your 2nd, 3rd & 4th layers
Activate your diamonds layer, Duplicate 3X. change your Magic Wand settings to this

Select each diamond. You will need to use your Lasso

to remove some of the selections of the sparkles that are already there on the diamonds

Apply Constellation with these settings (OMG...I didn't take a screenshot of my settings!! I am so sorry but this is the best I can figure I did) Play around with it til you get what you like

Click Random seed for your 2nd, 3rd & 4th layers
Activate your stars layer, Duplicate 3X
Activate your 1st stars layer and apply Constellation with these settings

Click Random seed for your 2nd, 3rd & 4th layers
Activate your name layer, Select>All, Select>Float, Select>Defloat, Merge Down on to your background layer and Drop Shadows, if you have them, Duplicate 3X, DO NOT SELECT NONE!
Activate your 1st layer and apply bright noise, following the same steps as before but change your settings to 60.
Now, duplicate your merged layers (the non-animated ones) 3x, so that you have 4 layers of each group and make Visible Only the 1st layer of each group
Activate your 1st visible layer, which will be your 1st background layer, right click on it and scroll to Merge>Merge Visible, make your merged layer invisible and repeat the same steps for the remaining 3 layers in each group.
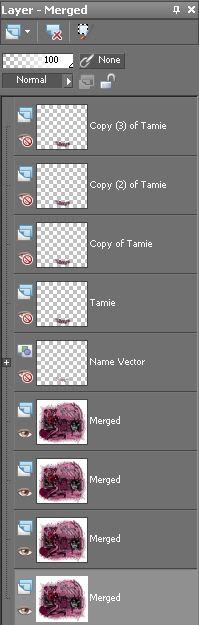
Your layers palette should now look like this

My name layers are not included because I save this image, at this point, as a WWO
Animation Shop3
Save as a .psd or a .psp(animation shop) and open in Animation Shop 3 or copy your 1st layer and Paste As New Animation, in AS3, Copy your second layer and Paste After Current Frame and repeat for the 3rd and 4th layers.
Select All (Ctrl+A), Frame Properties (Alt+Enter)=13, Optimize (Shift+Z)
One of these days, maybe I’ll write something short and sweet…lol…NOT
©X's & O's Dzynz and Tutorials
This Tutorial was written in May, 2011 by me, MsGoddess2U, and the concept of the tutorial is copyrighted.
See my TOU for further details
See my TOU for further details
No comments:
Post a Comment