

I wrote this tutorial using PSPX2 and Animation Shop3
I am using the awesome artwork of Keith Garvey (I’m using the Patch CU), you must have a license to use his work and you can purchase his work and get your license at PTE
I am using a wonderful kit called Biker Babe Collab and you can purchase it at PMTWS
Mask used is mask3 from Mask Pack1 by TallChic
Plug ins used:
Eye Candy 4000/Gradient Glow & HSB Noise
dsb flux/Bright Noise
Xenofex 2/Constellation
MuRa's Meister/Copies
Font Used:
Due Date
**c&p=Copy and Paste As New Layer
**When working with duplicate layers, I always refer to them as 1st, 2nd, 3rd…from the bottom up and 4th in this case
I do want to begin by apologizing to you…I did not write this tut as I went along. Some of the screen shots are going to contain elements that we have not yet covered in the tut, just focus on the one that we are discussing at that time.
Open a New Image 750 X 750, Transparent and Flood Fill with white
sb Frame2: c&p, resize 90%
Tube: c&p, position to liking, activate your frame layer and, with your Magic Wand, click inside your frame, grab your lasso, Selection Type: point to point, Mode: Add and select the area around the tube that you want to remain over the frame like this

Select>Invert, activate the tube layer and hit Delete on your Keyboard
Duplicate your tube and apply Xero/Radiance with default settings and reduce Opacity to 44, Merge Down
Activate your frame layer again and click inside with your Magic Wand, Selections>Modify>Expand:2, Invert
Now, activate your white background layer, c&p a paper of your choice (both folders have awesome papers to choose from), hit Delete, Select>None
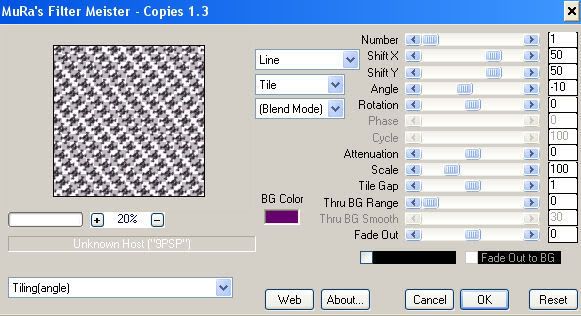
tk-paperskull-black: c&p, resize 10%, apply MuRa’s Meister Copies with these settings

Mirror, arrange above your paper background layer, position to liking, activate your paper layer, click on the transparent
area with your Magic Wand, activate your skull copies layer and hit delete on your keyboard, Select>None.
sb_motorcycle: c&p, Mirror, Resize 70%, position behind the tube to your liking.
sb_ribbon 1: c&p, Mirror, position to the left of your frame and just above your frame layer. The center of the screw, on mine is at 134X341

Duplicate, lock the 2 ribbons layers together, arrange the 2nd layer above your tube layer.
Activate your frame layer, Select>All, Select Float, Select>Defloat
Erase the parts of the ribbon that you don’t want covering your frame on both of your ribbon layers, like this


Take special caution here, erasing only enough of the 2nd ribbon layer to reveal the wheel and it’s shadow, if you are applying drop shadows

Select>None and erase the remainder of the ribbon on the second layer. I cut the edges off of the bottom, at an angle, too.

If you wish to apply to a drop shadow to the ribbon, apply it to your 1st ribbon layer, activate your tube, Select>All, Select>Float, Select>Defloat, activate your Ribbon shadow and Copy. Activate your tube layer again, Open New Raster Layer and Paste Into Selection, Select>None.
tk_wordart1:c&p, position to liking
sb_flames2: c&p, name the layer flame2, position to your liking, Duplicate, name the duplicate layer flame1, Mirror, arrange the layer below your paper background for the frame and just leave it where it is for now…you will position it a bit later.
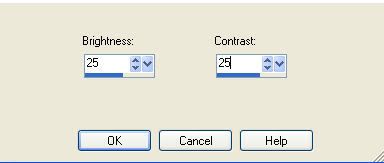
tk_skullpurplegem: c&p, Resize 50%, position to liking over flames2 and arrange the layer to just above the flames. With your Lasso set at Selection Type: Point to point, Mode: Add; zoom in on the purple eye and draw a selection around the gem. Adjust> Brightness and Sharpness>Brightness/Contrast


sb_word art 1: c&p, Rotate 25o Left, Resize 75%, position to liking. With your Magic Wand at these settings

Select only the pink part of the word art, right click on the layer in the Layers Palette and choose Promote Selection To Layer, name the layer Bitch, Select>None.
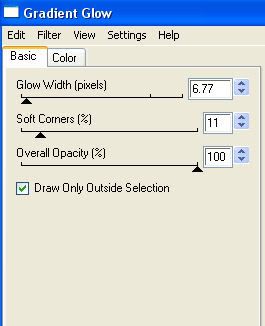
Jump down to your original word art layer and apply Gradient Glow; under the Color tab, select Fat and use these settings

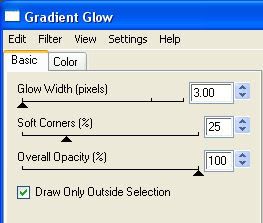
Apply Gradient Glow again with these settings


Lock these layers together
This is where I positioned my 2nd flame and cut out the part of the ribbon that was showing above the Bitch layer
tk-heartbanner-purpleplain: c&p, Rotate 25o Left, Resize 60%, position to liking.
Name: Grab your Oval Vector tool, set your background to transparent and your foreground to whatever color that stands out for you. Draw an Oval above your heart banner, rotate 25o left, go back to your vector tool and choose edit, to the left of the oval in tool bar and just tweak your oval until you have the curve that you want your text to be…mine looks like this

Grab your Pen tool

right click on your oval, select Convert To Path, right click on your oval again, go to Edit>Reverse Path
Open New Raster Layer (or your name will be added to your oval layer) grab your Text tool, and position it over the oval, centered on your banner, til you see a curved line under the “A”, Left click to open your text box and type out your name. You will need to adjust your Offset to get the text over your banner. This shows the settings I used; I set my Kerning to 50 just to stretch my initials out more.

(if you are going to save this image as a WWO, do not delete your Oval or Convert to a Raster, you may hide it though)
sb_chain link 2: c&p as a top layer so you can see what you are working with (I actually do this with everything and then arrange the layer where I want it) Resize 60%, Duplicate, Mirror, bring your duplicate layer down a little bit and line up the wire so that it goes together. Don’t worry about what the middle of it looks like because it is going behind the main portion of your design, Merge the 2 layers together, Duplicate, Flip and Mirror, position to liking, merge the 2 layers together, arrange the layer just above the white background. I grabbed my eraser and erased some parts to give it an uneven look and added a drop shadow to it.
Activate your white background layer, Open New Raster and Flood Fill with a color of your choice for your mask. Open you mask and minimize it, right click on your new flood filled layer and scroll up to New Mask Layer>From Image and select your mask like this

With your mask layer activated, use the Pick tool to get your mask the way you want it.
Add your copyright and license. I suggest that you place it a way that it can not be removed or altered without being obvious
Animation
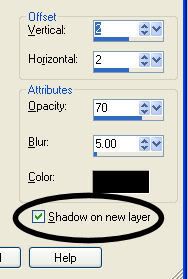
If you are adding Drop Shadows to anything that you are animating, make sure you do this BEFORE adding the animation and check the box Shadow on new layer; like this
(shadow on new layer)

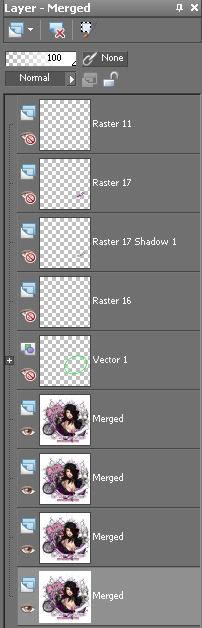
Now, make Visible Only the layers between the each layer that you are going to animate, including the Drop Shadows for that animated layer and Merge Visible. We are animating Bitch, motorcycle, flames1 and flames2. Your Layers Palette should look like this
(Layer palette1)

**Note that the name layer and the oval vector are not included because I always save my image as a .psp so that I can go back and add another name at any time
Duplicate your Bitch layer 3X, activate your 1st layer and apply
Bright Noise with these settings
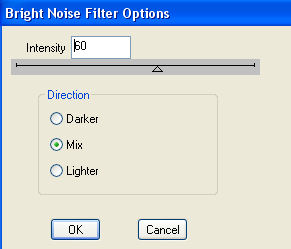
Click on mix 2X for your 2nd, 3rd, and 4th layers
Activate the flames1 layer, Duplicate 3X, activate your 1st layer, Select>All, Select>Float, Select>Defloat, and apply Eye Candy 4000/HSB Noise at default settings, repeat for the 2nd, 3rd &4th layers, clicking on Random Seed for each layer
Repeat these steps on flame2
Activate your motorcycle layer, Duplicate 3X, activate your 1st layer and with your Magic Wand set to

Select random bright spots of the chrome on the motorcycle
Apply Constellation with these settings

Clicking on Random Seed for the 2nd, 3rd and 4th layer.
Now, duplicate your merged layers (the non-animated ones) 3x, so that you have 4 layers of each group and make Visible Only the 1st layer of each group (not including the name or the oval vector, if you are saving as a WWO)
Activate your 1st visible layer, which will be your 1st background layer, right click on it and scroll to Merge>Merge Visible, make your merged layer invisible and repeat the same steps for the remaining 3 layers in each group.
Your layers palette should now look like this

After putting it all together and viewing the animation, I decided that it was a bit off balance…SOOOOOoooo…lol….I grabbed my Magic Wand with the same settings, and started selecting areas of the thread on the tk_word art; it looked like this all the way across

then I applied Constellation with these settings

Clicking on Random seed for each layer
Now I saved as a .psp for WWO’s
I converted my name to a Raster and added a slight drop shadow, duplicated it 3X times and merged one onto each layer, Deleted the oval, resized, and saved as a .psd. (Cuz that’s how I prefer to do it, rather than jumping back and forth from one program to the other…that’s just me though)
Save as a .psd or a .psp(animation shop) and open in Animation Shop 3 or copy your 1st layer and Paste As New Animation, in AS3, Copy your second layer and Paste After Current Frame and repeat for the 3rd and 4th layers.
Select All (Ctrl+A), Frame Properties (Alt+Enter)=13, Optimize (Shift+Z)
We are finally done and I hope that you enjoyed it. I would love to see your creations and I think I am going to add a creations page for tags that are sent to me made from my tutorials…just email them to me;)
©X's & O's Dzynz and Tutorials
This Tutorial was written in May, 2011 by me, MsGoddess2U, and the concept of the tutorial is copyrighted.
See my TOU for further details
See my TOU for further details
No comments:
Post a Comment