
I wrote this tutorial using PSPX2 and Animation Shop 3
This tut is written for those with a working knowledge of PSP and AS3 (Although, I do try to write them in a way that, those of you who are new, can understand and follow them too).
I am using a darling tube by an artist I have just discovered, Al Rio
You must have a license to use his art and you can purchase his art at Taggers Delight
I am using an older but gorgeous kit by Tamie, called Magic Box. You can purchase it at Dreams-N-Digital
Masks used are jojogrungyheart1 from Srappy Moments
Don't forget to leave some love;)
and I am still having problems with Mediafire so here's the one that I made for this tag, just right click and save

Plug-Ins Used:
Xenofex / Constellation
dsb flux / Bright Noise
Eye Candy 4000 / Gradient Glow
Fonts Used:
James Fajardo
HandmadeScript
**c&p=Copy and Paste As New Layer (I always c&p as a top layer, so I can see what I’m doing, then arrange the layer where I want it)
**When working with duplicate layers, I always refer to them as 1st, 2nd, 3rd…and so on, from the bottom up.
Remember to save often!!
Ali Rio Fairy: c&p as New Image, Resize Height to 500 pixels Resize Canvas 750 X 750 Centered

Open New Raster Layer, arrange below the tube layer and flood fill with white, name it Background
From Tamie’s Kit
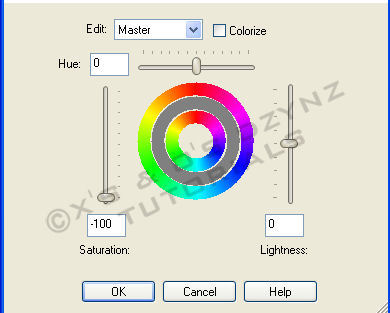
Leaf Heart: c&p, Resize 80%, Desaturate (Adjust>Hue and Saturation>Hue/Saturation/Lightness)
Use your Manual Color Correction tool with these settings Source:#c0bcba, Target:#a7a814
Apply Brightness and Contrast (Adjust<Brightness and Contrast>Brightness/Contrast)

Duplicate and lock the 2 heart leaf layers together, arrange one below the tube and the other above. Position the tube so that the flowers are just barely under the edge of the leaf heart, so that the blunt edge is not visible
First, you are going to erase the tree branch, on the tube, that is sticking out of the leaf heart. Next, erase most of the 2nd leaf heart, except for the parts that are at the edges of the branch, on the left and at the edges of the flowers, on the right.
My 2nd leaf heart layer looked like this

If you are satisfied with what you have, merge the remainder of the 2nd layer down onto the tube layer; leave your 1st heart leaf layer standing alone, you can add a Drop Shadow on the same layer.
If you are adding drop shadows to the Tube, make sure you add them on a separate layer. Most of the time, I add a slighter shadow one direction (V & H: -1 or -2 (depending on the tube), O: between 20 & 50, B: is 3, some times less, just depends on the design). The second shadow I add is darker and comes out more for example (V & H: 3, O: 60, B: 5)…all depends on personal taste
Activate the Background layer, grab your Preset Shapes tool and draw out a heart that is within the leaf heart dimensions (if you don’t have one, you can find some here).
Mine looked like this

Convert To Raster, with your Magic Wand, click on the heart Select>Modify>Feather:40, Invert Selection. Make the heart Invisible.
P11: c&p, hit delete on your keyboard, Select>None
p12: activate your background layer again, c&p p12, duplicate this paper and Resize the 1st layer by 110% and make it invisible, for now.
Open the jojogrungyheart1 mask and minimize. Right click on the visible paper layer, in the Layers Palette, scroll up to New Mask Layer>From Image and choose the jojogrungyheart1 mask from the drop down menu

The mask layer is automatically activated; use your Pick tool set to Scale to bring it in to the edges of your leaf heart, right click on one of the layers in the group and Merge>Merge Group, Duplicate and Merge Down, to make it darker. Now, make your tube invisible and grab your rectangular selection tool and select half of the heart on the right side, like this


Hit Delete on the keyboard, Select>None, Duplicate, Mirror and Merge Down, Add Drop Shadows On A New Layer

1st shadow V&H: -1, O: 100, B; 3, Color #7f5a75 / 2nd shadow, change only V&H: 1, all the other settings the same. Once you have done this, change the shadow color back to black
diamondrain: c&p, this one is all up to you…I cut and pasted different strands and parts of strands until I got what I wanted. Merged the layers together, arranged below my jojogrungyheart1 mask; activated the heart layer that I made with my preset shapes and, with my Magic Wand, clicked on the transparent part of the layer, activated the diamondrain layer and hit delete on the keyboard and added a Drop Shadow (V & H: 0, O: 50, B: 5 Color: Black) on a separate layer to make them show up more (we are going to add constellation to them)
Butterflies: c&p, Manual Color Correction Tool Source: #928fa4, Target: #148eb3, I arranged my original butterfly layer just above my jojogrungyheart1 mask, I cut a few and pasted them on new layers and moved them around to different places and arranged some layers above the tube, just do what you like with them
Flowers: c&p, Desaturate, Manual Color Correction tool Source: #393939, Target: #144465, Rotate 45o Right, position at the bottom of the leaf heart and arrange layer just above the tube, Duplicate, Mirror, arrange layer down above the leaf heart layer. I added light drop shadows to these, on the same layer, just to give them more depth, simply un-tick the box that is circled in the above screenshot
On your 2nd layer, grab your Lasso, set to Selection type: Point to Point, Mode: Add, Feather: 0, Smoothing: 0. Activate the 2nd layer of flowers and select the flowers that are covering her foot and a little more, to allow for tube Drop Shadow, Cut, activate 1st flowers layer, Edit>Paste Into Selection, Select>None
Flower: c&p, Desaturate, Manual Color Correction tool Source: #4c4c4c, Target: #145376, Resize 30%, Mirror, position to liking, arrange above 1st flowers layers
Flower2: desaturate, Manual Color Correction tool, same settings, Resize 25%, position to liking, arrange above flower layer, Duplicate and position to liking
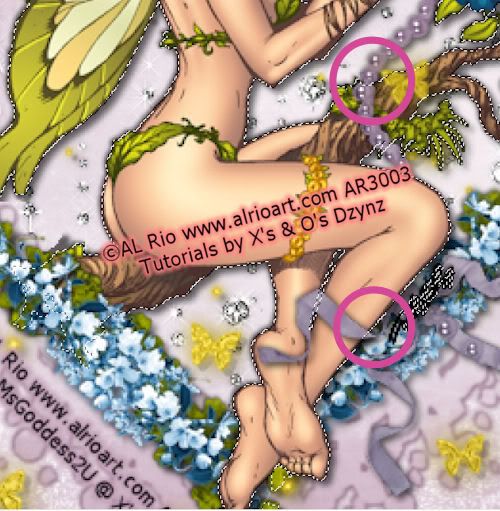
ribbonndpearls: c&p, position and arrange above the leaf heart, Drop Shadow on same layer, Duplicate, arrange above tube, activate tube layer, Select>All, Select>Float, Select>Defloat, Invert, erase all the parts that you can, taking special care to leave a little extra at the top part of the branch and where the ribbon comes over the lower part of her leg.

Select>None, Erase the rest of the ribbon that is covering the tube
This is what my overlay looks like

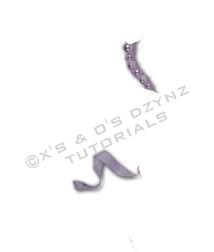
Name this layer ribbonndpearl overlay
Fairycharm: c&p, resize 55%, apply Brightness and Contrast


Position to liking and arrange above the 1st ribbonndpearls layer (not the overlay)
if you add drop shadows, add them on a separate layer
Never Stop Believing: James Fajardo font
Of course, you can put what ever wording you choose
Set your Foreground to #25678b and your Background to #14bad9. Open your Background options, select the Foreground/Background Gradient, set your Angle to 31, Repeats 10 and click OK. Type out your wording and Convert To Raster. Select>All, Select>Float, Select>Defloat, Expand 2. Activate the layer below your wording, Open New Raster Layer and flood fill your selection with white, name the layer (what ever your wording is) background, Select>None add a light Drop Shadow both directions, on the same layer
Name: HandmadeScript font
Choose a color of your liking for the background and set your foreground to a color that you want for the outline but make sure your Stroke is set to “0”
Type out your name and click on Apply, Rotate it 45o Left and position; you can go back and change the font size by just positioning your text tool over your name and then click as soon as you see [A] and your text box will open with your name highlighted.
Once you have your name the way you like it, Convert to Raster and Duplicate
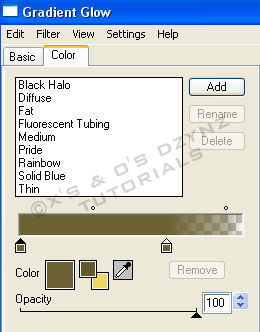
Activate the 1st name layer and apply Gradient Glow with these settings, select Fat and then change both color tubes to your Foreground color

I added Drop Shadows of (V&H: -1, O: 30, B: 3 and V&H: 2, O: 45, B: 5) to this layer, on the same layer
Find a good place for the copyright and your license #. I suggest that you place it in a way that it can not be removed or altered without being obvious. Also, I learned a while back, that a slight Gradient Glow with a light color, will help in making your info more visible.
My Mask: Make the remaining p12 paper layer visible, open my mask and minimize and apply the mask the same way that you did the other one, you can adjust the size, if you would like, with the Pick tool and lower the opacity to your liking; mine is at 59%
Add any other Drop Shadows to your liking
Now Let’s Animate
First, merge together all the non animated layers that are between the animated layers. I don’t know about your PSP, but for some reason, my shadows are getting hella darker when I just merge down (with this one particular and there have been a few in the past that have done that, so I’ve had to make each group of layers that I wanted to merge, the only ones visible and Merge>Merge Visible
You can merge together everything between the fairycharm and the jojogrungyheart1 mask; you can only merge the 2 shadows to the heart mask together; your tube shadows can only be merged together too; you can start with the diamondrain shadow and merge them together with the background; if you have butterflies above the tube, you can merge those layers together too
Let’s do everything that has Bright Noise first and then we’ll do everything that has Constellation
Activate the jojogrungyheart1 mask layer. Select>All, Select>Float, Select>Defloat, Merge Down onto the merged shadow layer and Duplicate 3X
Activate the 1st layer and apply Bright Noise with these settings

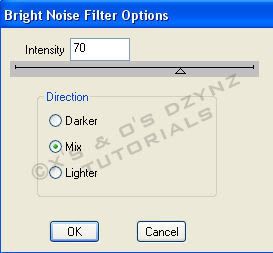
Repeat on the 2nd through the 4th layers, clicking on Mix 2X for each new layer
Activate the tube layer: select around the wings with the Lasso tool, making sure to be careful where the wings meet the back and, at the bottom tip of the wings, you want to be careful not to include any part of the leaf. Right click on the layer, in the Layers Palette and select Promote Selection To Layer, name the layer fairy wings and Duplicate 3X
Activate the 1st layer and apply Bright Noise with these settings

Repeat on the 2nd through the 4th layers, clicking on Mix 2X for each new layer
Never Stop Believing or other wording: Activate the layer, Select>All, Select>Float, Select>Defloat, Merge Down onto the wording background, Duplicate 3X
Activate the 1st layer and apply Bright Noise with these settings

Repeat on the 2nd through the 4th layers, clicking on Mix 2X for each new layer
Activate your name layer, Select>All, Select>Float, Select>Defloat, Merge Down onto, 1st name layer, Duplicate 3X and apply Bright Noise with these settings

Repeat on the 2nd through the 4th layers, clicking on Mix 2X for each new layer
Now for the Constellation
Activate the diamondrain layer, Duplicate 3X, Activate the 1st layer and apply Constellation with these settings

Repeat on the 2nd through the 4th layers, clicking on Random seed for each new layer
Grab your Magic Wand with these settings

Activate the fairycharm layer, select only the strings that the fairies are hanging on

Duplicate 3X
Activate the 1st layer and apply Constellation with these settings


Repeat on the 2nd through the 4th layers, clicking on Random seed for each new layer
Activate the ribbondpearl layer, Duplicate 3X, activate the ribbonndpearl overlay layer and duplicate 3X
With your Magic Wand on the same settings, select the white part of random pearls (I selected about every other one) do this on the overlay layer too.
You are going to have to jump back and forth between the full layer and the overlay, so you will need to pay close attention and do not hit Random seed between each corresponding overlay; we are treating this as one object, which it will be once we are done
This is about what my selection looked like, I filled the selections with a pink shade because the marching ants selections were so small
This is about what my selection looked like, I filled the selections with a pink shade because the marching ants selections were so small

Activate the 1st ribbondpearl layer and apply Constellation with the same settings used on diamondrain
Repeat on the 1st overlay layer
Activate the 2nd ribbonndpearl layer and apply Constellation, clicking on Random seed, activate the 2nd overlay layer and apply Constellation
Repeat these steps for the 3rd and 4th layers of both groups clicking on Random seed for the ribbonndpearl layers only
Activate the 1st fairy wings layer and apply Constellation with these settings

Repeat on the 2nd through the 4th layers, clicking on Random seed for each new layer
Now you can Merge Down the tube onto the shadow and duplicate all non-animated layers so that you have 4 layers of everything
Activate your 1st background layer (the very bottom layer in your layers palette), right click, View>Current Only
Now, make ONLY the 1st layer of each group visible, right click on your visible background layer, Merge>Merge Visible.
Make this merged layer invisible and make the next layer in each group visible, right click on your visible background layer, Merge>Merge Visible make this layer invisible and repeat these steps for the next 2 layers in each group
View>All, Crop, Resize to your liking and save as a .psd or .psp (animation shop)…I always save as a .psd and a .pspimage (for the WWO’s)
OR
you can copy (Ctrl+C) your 1st layer and Paste As New Animation (Ctrl+V) in AS3, Copy your 2nd layer and Paste After Current Frame (Shift+Ctrl+L) and repeat with your 3rd and 4th layers but I have had some get all screwed up that way, so I prefer to just save it and open in AS3
If you are saving as a WWO, you know what to do…if you don’t, refer back to one of my earlier tuts
Animation Shop 3
Open your image in AS3, Select>All (Ctrl+A), Frame Properties (Alt+Enter) and change the value to 13, hit Enter on the keyboard. and Optimize (Shift+Z)
Well…a lot of animation but we are finally done!
I would love to see your version or results of my tut and would like to add them to my blog. Feel free to email them to me; just make sure that you put “tut results” or something to that effect, in the subject or I will delete it without opening it
©X's & O's Dzynz and Tutorials
This Tutorial was written in August, 2011 by me, MsGoddess2U, and the concept of the tutorial is copyrighted.
See my TOU for further details
See my TOU for further details